How to draw a hamburger is one of those fun, simple drawing ideas that instantly makes you smile — and today I’m so excited to share my own cute hamburger drawing process with you.
I still remember the first time I tried drawing food illustrations. I wanted something playful, colorful, and easy enough that anyone could follow along without feeling overwhelmed. That’s exactly why I created this how to draw a hamburger tutorial. It’s beginner-friendly, but the final result still looks polished and adorable.
If you’ve ever thought, “I’m not good at drawing food,” trust me — I’ve been there too. The secret isn’t talent. It’s breaking things down into simple shapes and building them step by step. That’s what we’re doing here.
So grab your pencil, relax your shoulders, and let’s dive into this cute hamburger drawing together.
Why Drawing a Hamburger Is Easier Than You Think
When people search for how to draw a hamburger, they often imagine something complicated with perfect proportions and realistic shading. But here’s the truth: a hamburger is basically just a stack of soft curves.
That’s it.
No tricky anatomy.
No complicated perspective.
Just smooth, rounded shapes layered on top of each other.
And once you understand that, everything becomes much easier.
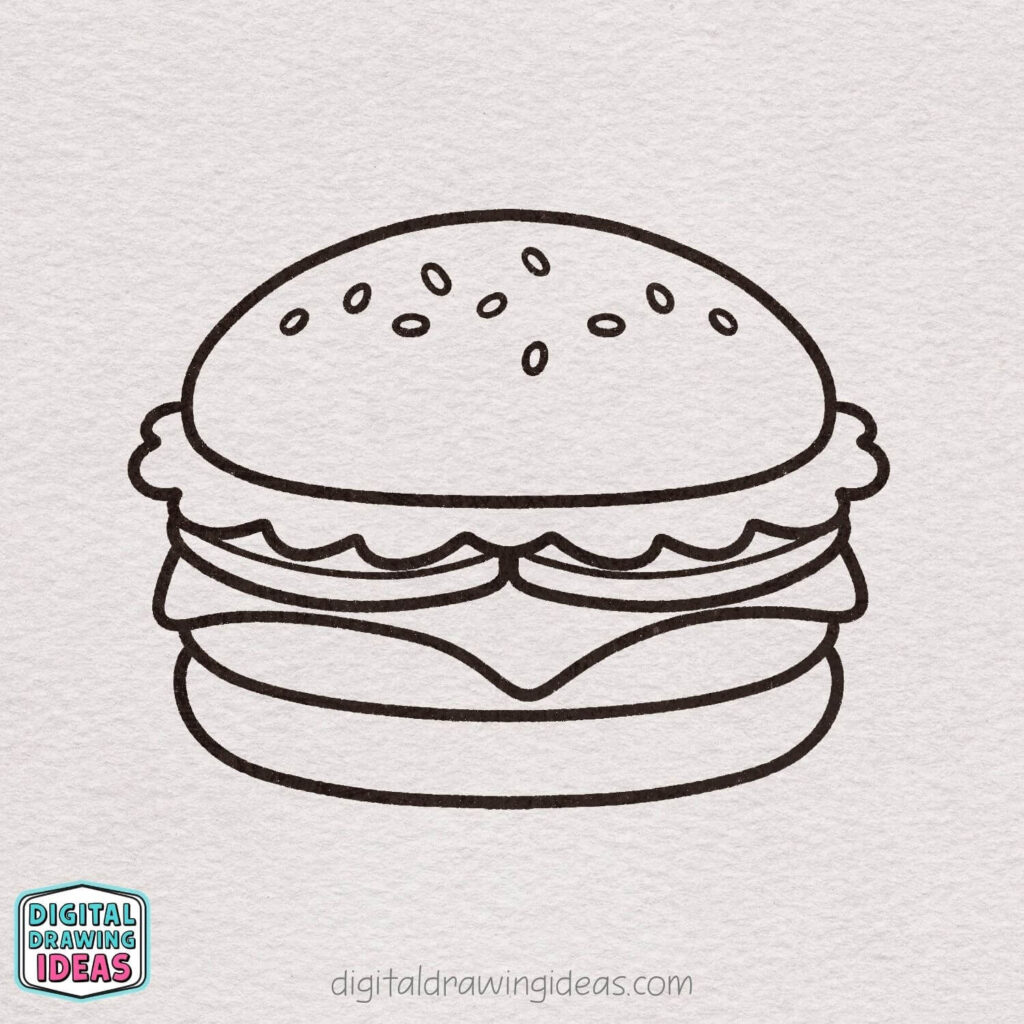
Step 1: Draw the Top Bun Shape
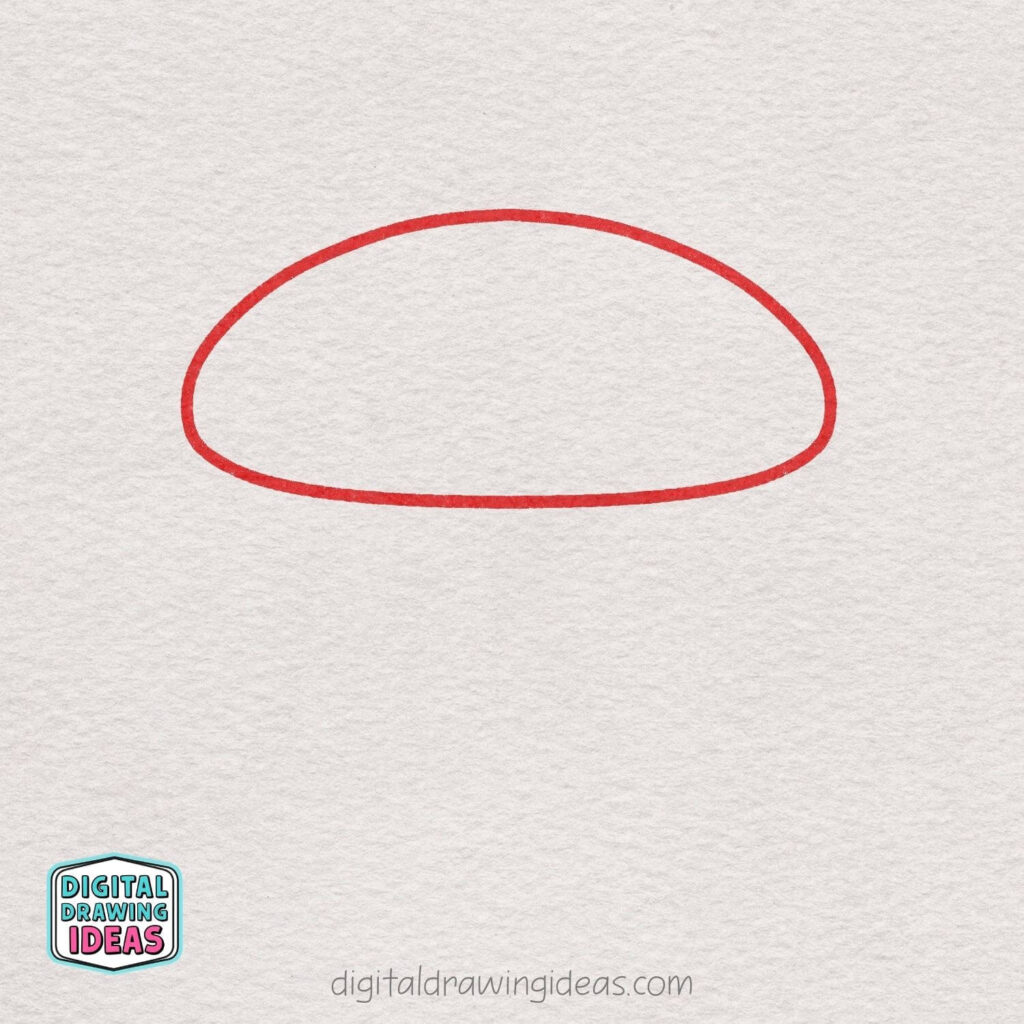
Start by drawing a wide, curved line that looks like a soft hill.
Then gently connect the ends with a slightly flatter curved line at the bottom to create a rounded dome shape. Think of it as a squished oval — nice and smooth!
Don’t worry about making it perfect. Keep your lines light and relaxed. This will be the fluffy top bun of your hamburger.
Step 2: Add the Wavy Lettuce
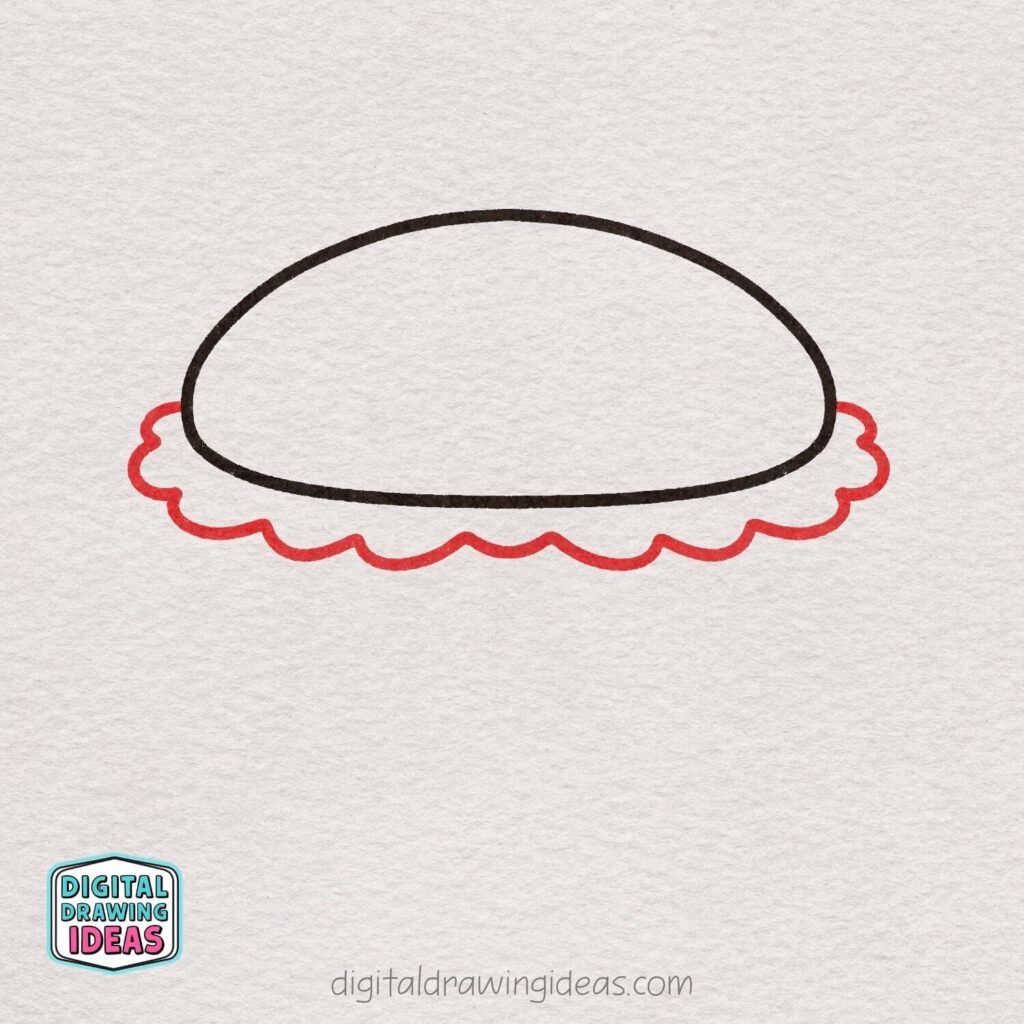
Under the bun, draw a long, wavy line that stretches from one side to the other.
Create small, rounded bumps as you go — like fluffy clouds or gentle waves. This will be your fresh, curly lettuce peeking out from under the bun.
Let your hand move naturally and keep the waves soft and uneven. That’s what makes the lettuce look nice and realistic!
Step 3: Draw the Tomato Slices
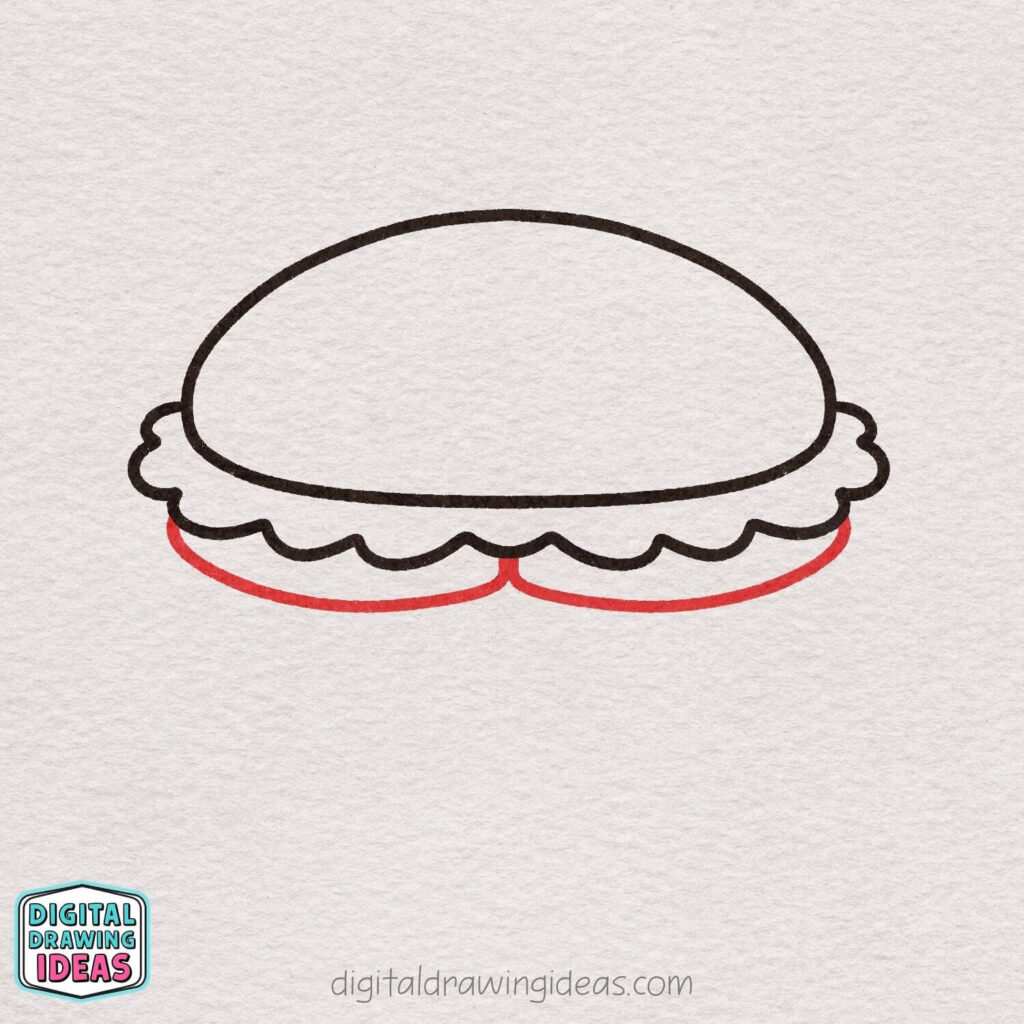
Under the lettuce, draw two wide curved shapes for the tomato slices.
Start on the left and draw a smooth, slightly curved line downward, then repeat the same shape on the right side. Let the two curves meet gently in the middle so they look like two round slices sitting next to each other.
Keep the lines soft and simple. These are juicy tomato slices peeking out from under the lettuce!
Step 4: Add the Inner Tomato Lines
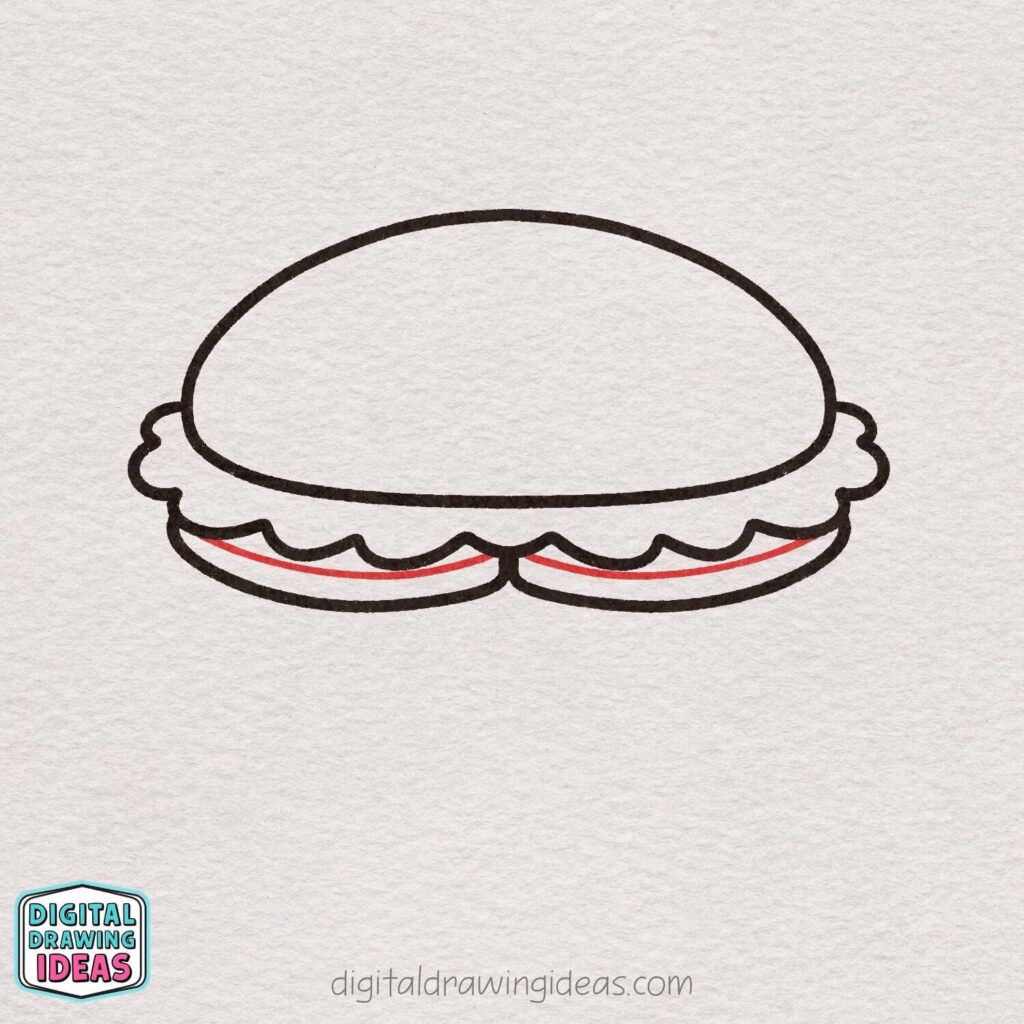
Now let’s give the tomato slices a little more detail.
Inside each tomato shape, draw a thin curved line that follows the bottom curve of the slice. Keep the line close to the edge and gently rounded, just like the outer shape.
These simple lines make the tomatoes look thicker and more realistic. Nice and easy — you’re doing great!
Step 5: Draw the Melting Cheese
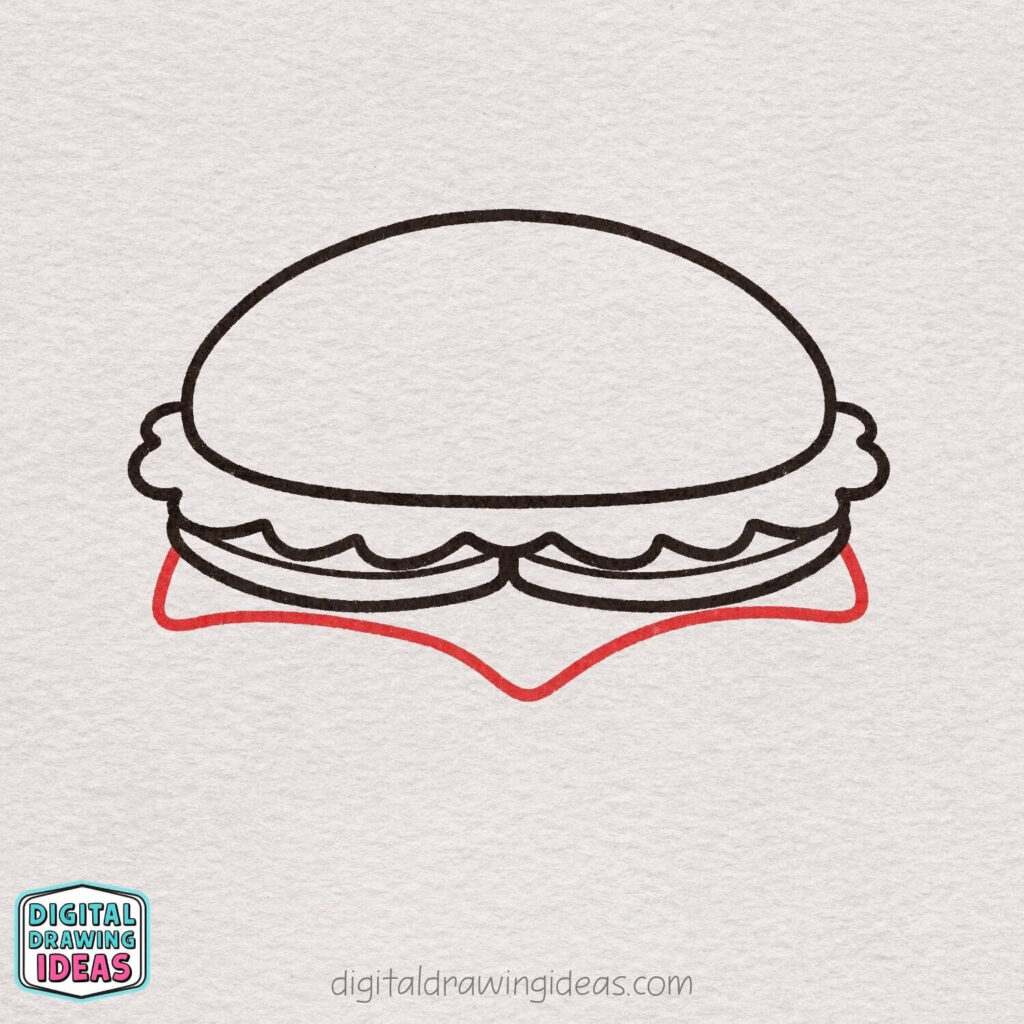
Now let’s add a slice of cheese under the tomatoes.
Start on the left side and draw a soft, slightly curved line going outward. Then bring it down into a gentle point in the middle, and curve it back up toward the right side.
Think of it like a wide “V” with rounded edges — soft and a little droopy. This will make the cheese look like it’s melting perfectly over the burger.
Step 6: Draw the Burger Patty
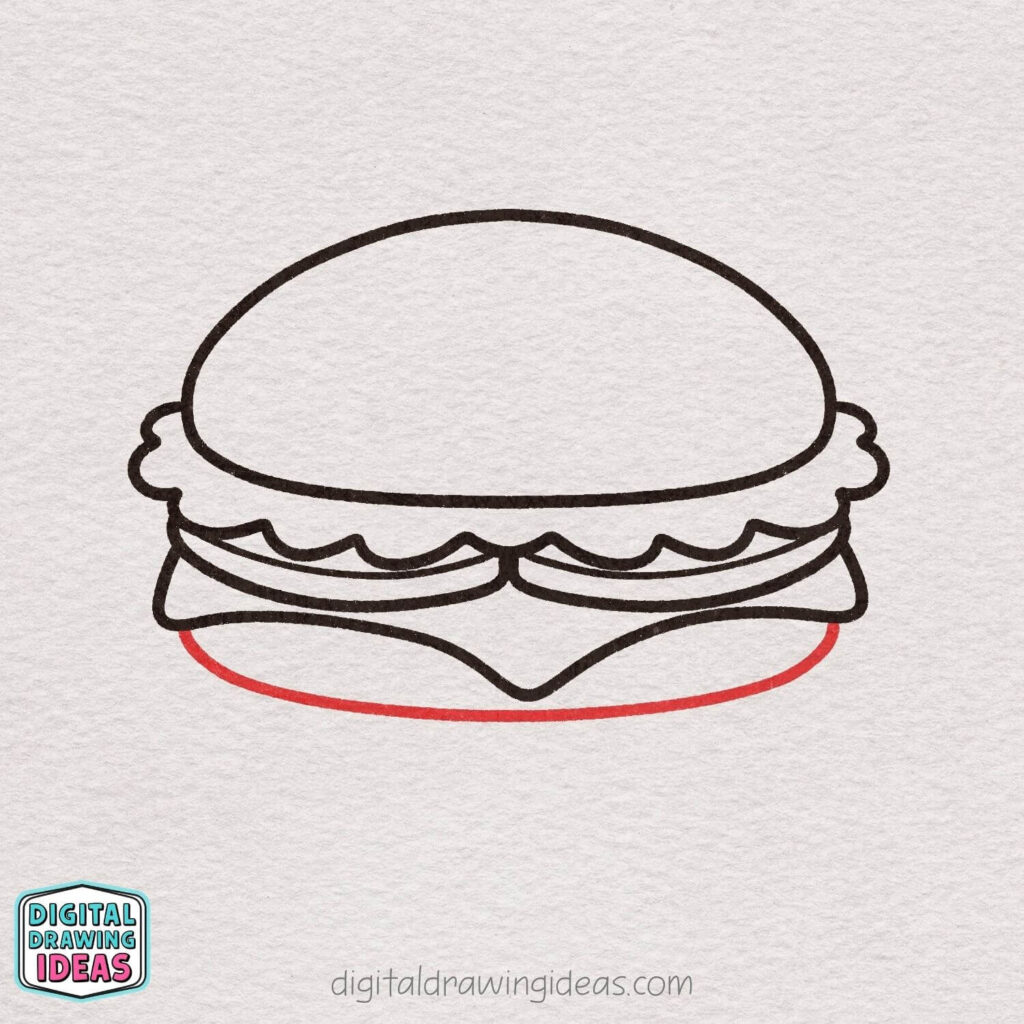
Under the cheese, draw a long, slightly curved line from left to right.
Make it gently rounded, similar to the bottom of the bun, but a little flatter. This will be the top edge of your burger patty.
Keep the curve smooth and even. Now your hamburger is really starting to look delicious!
Step 7: Draw the Bottom Bun
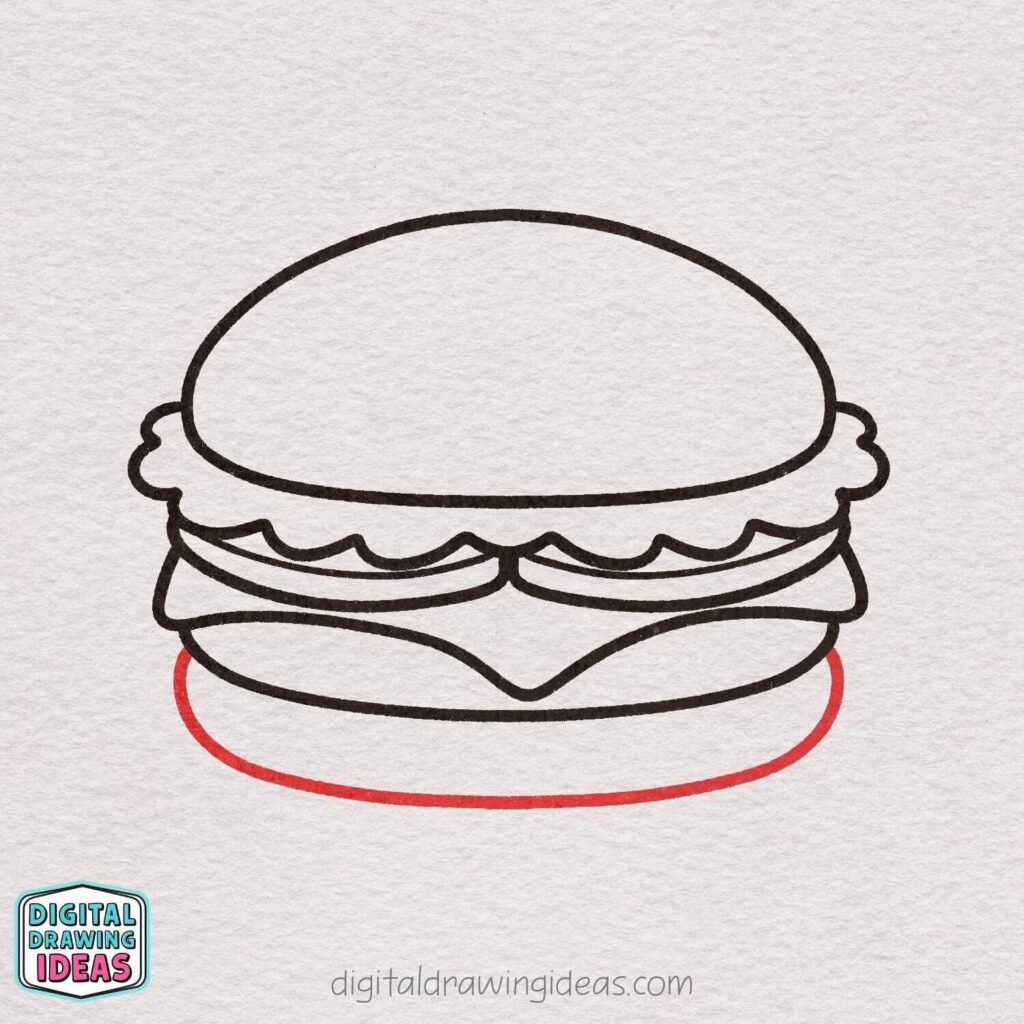
Now let’s add the bottom bun to hold everything together.
Under the patty, draw a wide, curved line from the left side to the right side. Make it similar to the top bun, but slightly flatter and a little thicker-looking.
Keep the curve smooth and steady. This will complete the full burger shape and make it look nicely stacked. Great job — it’s coming together beautifully!
Step 8: Add the Sesame Seeds
Now let’s make the top bun extra tasty!
Draw several small oval shapes scattered across the top of the bun. Keep them slightly tilted in different directions so they look natural and playful.
Space them out evenly, but don’t line them up perfectly — a little randomness makes them look more realistic. These tiny details really bring your burger to life!
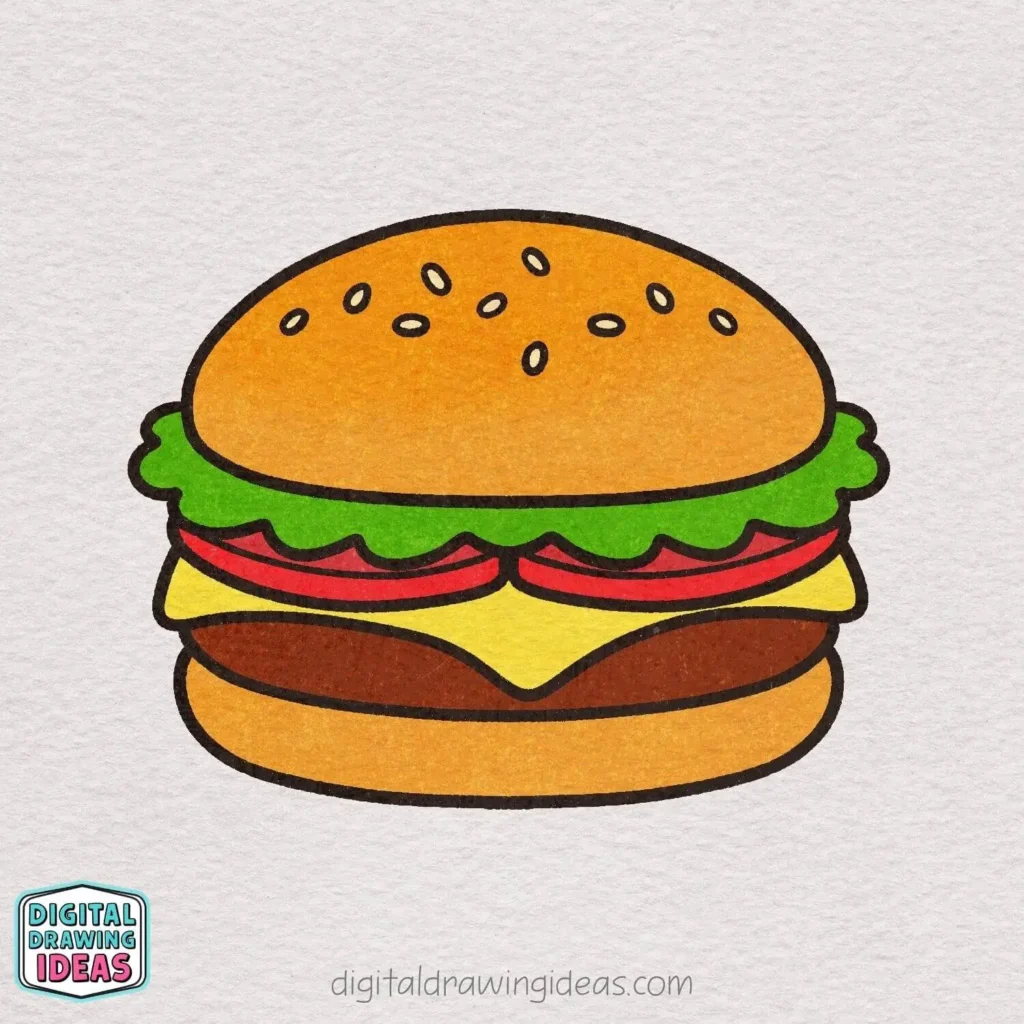
Step 9: Color Your Delicious Hamburger
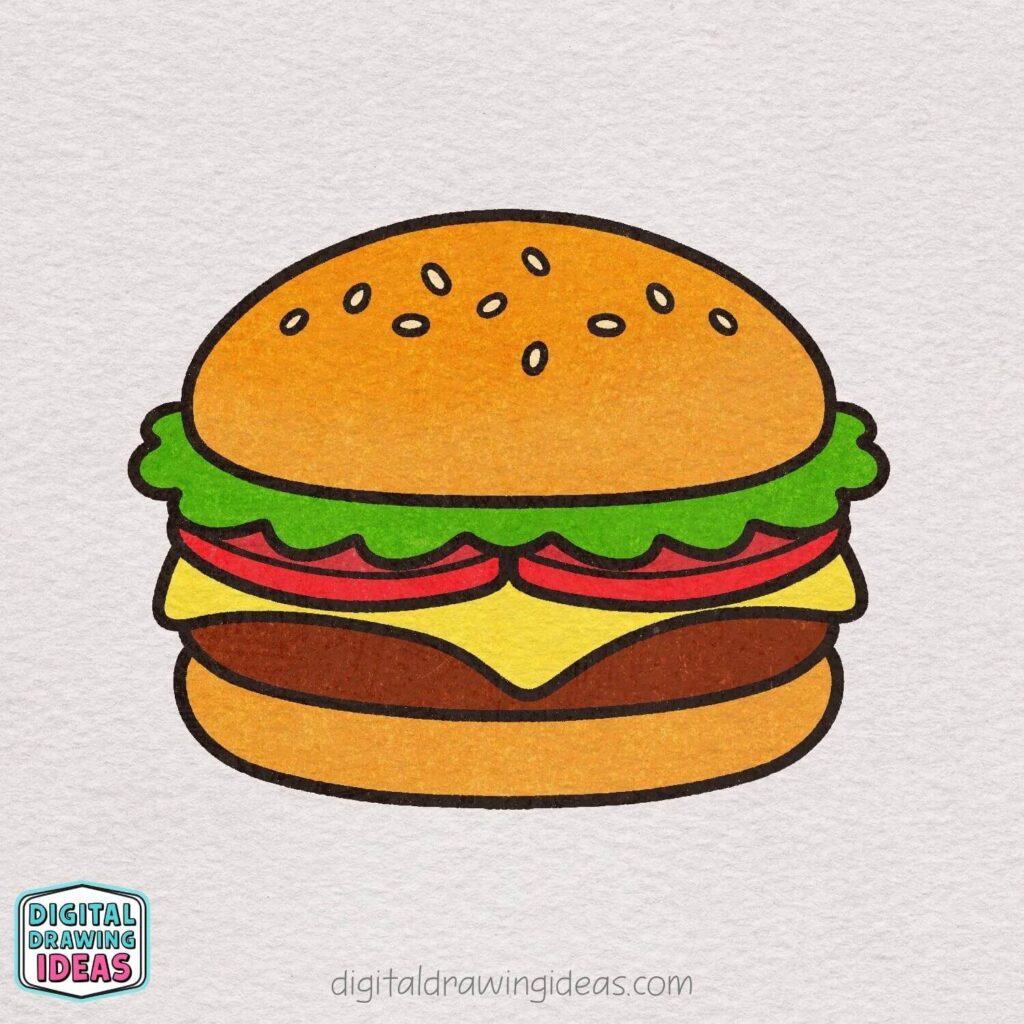
Now it’s time to bring your drawing to life with color!
Color the top and bottom buns a warm golden brown. Add a slightly darker shade near the edges if you’d like a soft toasted effect.
Make the lettuce bright green, the tomatoes vibrant red, and the cheese a rich yellow. Color the patty a deep brown to give it that juicy, grilled look.
Take your time and enjoy this part — coloring is where your hamburger really starts to look extra tasty. Great job finishing your drawing!
Common Struggles When Drawing Food (And How to Fix Them)
Let me guess — maybe you’ve experienced one of these:
- Your burger looks flat instead of stacked
- The ingredients feel uneven
- The bun looks stiff instead of soft
- Your hamburger drawing feels “off” but you don’t know why
I’ve struggled with all of these.
What helped me most was:
- Keeping my lines relaxed instead of pressing too hard
- Using gentle curves instead of straight lines
- Slightly exaggerating the roundness for a cuter look
- Adding tiny details (like sesame seeds) at the very end
When I started focusing on softness and flow, my food drawings immediately looked better.
Drawing food should feel fun — not stressful.
Making Your Hamburger Drawing Extra Cute
If you want your cute hamburger drawing to really stand out, here are a few extra tips I personally use:
- Add soft shading near the edges of the bun
- Use slightly brighter colors than real life for a playful look
- Keep outlines bold and clean
- Make the cheese slightly droopy for personality
Sometimes I even imagine the smell of a freshly toasted bun while coloring — warm, slightly sweet, buttery. It sounds silly, but thinking about real textures and smells helps me choose better colors and shading.
That’s the magic of storytelling in art. You don’t just draw a burger — you draw the feeling of it.
Keep the Creative Momentum Going
If you enjoyed learning how to draw a hamburger, I know you’ll love these tutorials too:
- How to Draw a Cupcake (Easy Cupcake Drawing Tutorial)
- How to Draw a Carrot (Easy Carrot Drawing Tutorial)
- How to Draw a Hamster (Cute Hamster Drawing)
You can find them on my blog:
Each one follows the same friendly, step-by-step style — because I truly believe anyone can learn to draw with the right guidance.
Let’s Connect and Keep Creating
I share new drawing ideas regularly, and I’d love to see your version of this hamburger drawing.
You can:
- Follow me on Pinterest: Digital Drawing Ideas on Pinterest
- Watch video tutorials on YouTube: Digital Drawing Ideas on YouTube
- Tag me on Instagram @digitaldrawingideas so I can see your artwork
Seriously, nothing makes me happier than seeing your drawings. It’s why I started this in the first place.
Final Thoughts: You Can Absolutely Draw This
If you searched for how to draw a hamburger, I hope this guide gave you confidence — not just instructions.
Drawing is not about being perfect. It’s about showing up, putting pencil to paper, and enjoying the process.
I created this cute hamburger drawing tutorial because I love turning simple ideas into something playful and approachable. And I truly believe that you can do the same.
So tell me — how did your hamburger turn out?
Did you make it classic, extra cheesy, or totally over-the-top?
Leave a comment on Pinterest, share your drawing, and let’s keep creating together. I can’t wait to see what you make next.

