Have you ever seen a cute flower bouquet drawing and thought, “I wish I could draw something like that”?
Well, friend—I’ve got great news. You absolutely can, and today I’ll show you how to draw a flower bouquet step by step in the easiest (and happiest!) way possible.
I created this bouquet tutorial on a cozy Sunday morning with a sketchbook in one hand and a cup of tea in the other. Drawing is my version of self-care, and I promise—this guide is here to bring you the same kind of joy.
This is a beginner-friendly drawing that looks impressive, but it’s built with simple shapes and sweet details. You’ll end up with a bouquet full of smiling flowers—perfect for cards, journaling, or just brightening your day.
Why you’ll love this flower bouquet drawing:
- It’s easy to follow (really!)
- Great for beginners or kids
- Super cute and cheerful
- Perfect for coloring or gifting
- You’ll get to practice drawing flowers, leaves, bows, and more!
All you need is a pencil, paper, and maybe some colored pencils or markers if you want to bring it to life at the end.
Let’s get drawing!
Step 1: Draw the first flower shape

Let’s start your cute bouquet! Draw a simple flower with six rounded petals, like a little cloud with soft edges. This will be one of the cheerful flowers in your bouquet, so keep the lines nice and smooth.
Step 2: Add another flower next to it

Now draw a second flower shape just to the right of the first one. Make it the same size and style, with those cute rounded petals. Let them slightly overlap so they look like they’re snuggling together in your bouquet!
Step 3: Start the big flower in the middle

Draw a curved line between the two flowers to begin the petals of a larger bloom. Think of it like a wide “U” shape with soft edges, gently peeking out from behind the smaller flowers. This will help build a layered bouquet look!
Step 4: Extend the large flower’s petals

Continue drawing the large flower by adding two big, wavy petals on top. Let them curve outward gracefully, like butterfly wings, to give this bloom a more open and elegant look.
Step 5: Finish the large flower’s top petals

Add two more rounded petals above the previous ones to complete the large flower. Draw a soft line down the middle to separate them slightly, giving the bloom a full and layered appearance.
Step 6: Draw a small circle for the bow

Let’s start the cute bow for the bouquet! Draw a small circle below the flowers. This will be the center knot of the bow that ties everything together.
Step 7: Add the bow loops

Draw two rounded loops on each side of the small circle to form the bow’s shape. Make them look like cute little butterfly wings so the bow feels soft and cheerful!
Step 8: Draw the bow’s ribbon tails

Add two short, angled rectangles hanging down from the bow. These are the ribbon tails, and they’ll make your bouquet look like it’s tied up neatly and ready to give!
Step 9: Draw the wrapping for the bouquet

Now add the bouquet’s wrapping! Draw two slightly curved lines coming up from the bow, then connect them at the top with a soft curve. This creates the paper wrap that holds all the pretty flowers together.
Step 10: Add the flower stems

Draw a few straight lines from the flowers down into the wrapping. These are the stems peeking out, making your bouquet look fresh and full of life!
Step 11: Add a tiny flower on top

Draw a small, simple flower with four rounded petals on a thin stem coming from the large bloom. This adds a cute little accent that makes your bouquet feel extra cheerful and playful!
Step 12: Draw two leaves on the right

Add a pair of simple leaves near the right flower. Draw them as pointed ovals with a line in the middle for the vein. These little leaves will make your bouquet look fuller and more natural!
Step 13: Add another leaf and a stem

Draw one more leaf peeking out from behind the bow wrapping, plus a little stem above it. This helps balance the bouquet and makes it look nice and full!
Step 14: Draw more leaves around the bouquet

Add four more small leaves around the top and sides of your bouquet. Place two on the left and two on the right to make it look lush and full of greenery!
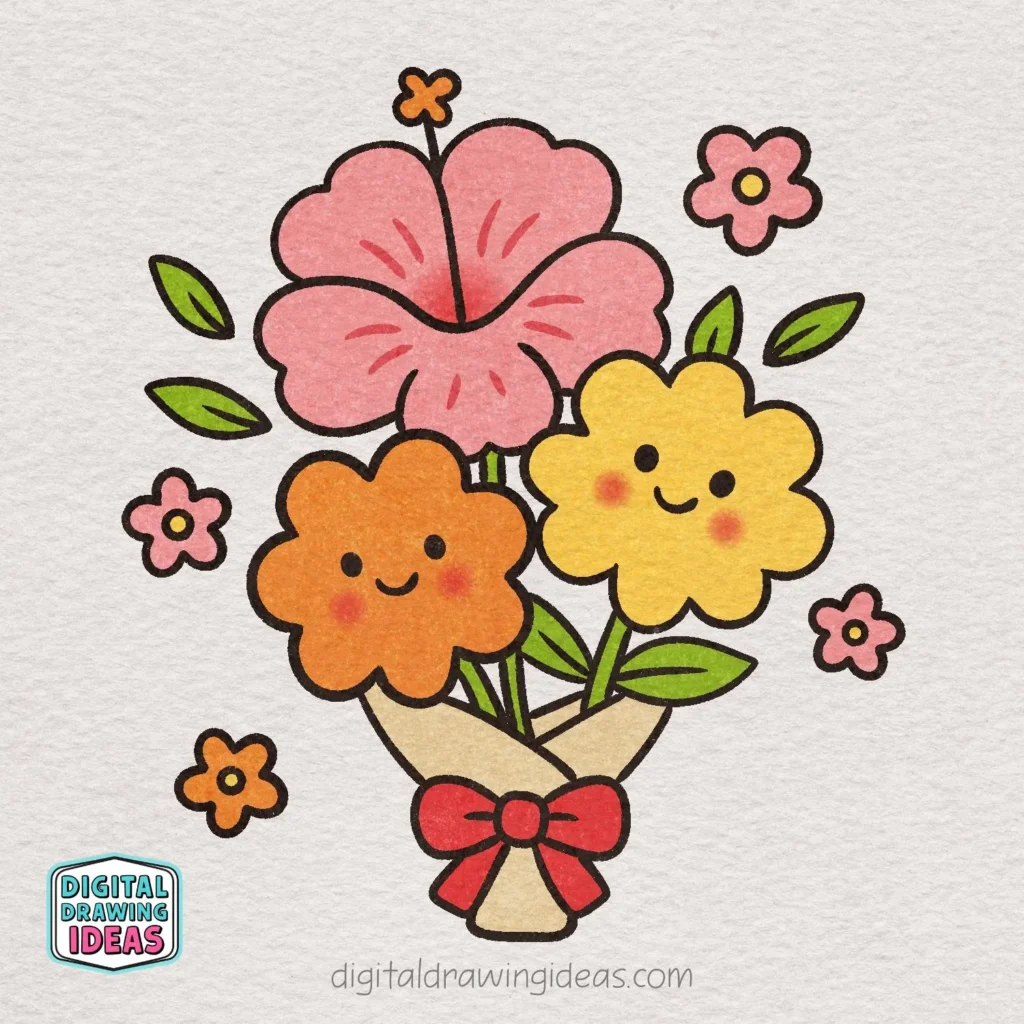
Step 15: Add happy faces to the flowers

Time to give your bouquet some personality! Draw two little eyes and a smiling mouth on each of the lower flowers. Now they look extra cute and cheerful, ready to brighten anyone’s day!
Step 16: Add little floating flowers around the bouquet

Draw four tiny flowers with round petals around the outside of your bouquet. These fun floating blossoms make the whole drawing feel lively and whimsical!
Step 17: Outline everything to finish the line art

Go over all your lines to make them nice and bold. This will clean up your drawing and get it ready for the final touch—color! Your cute bouquet is almost complete!
Step 18: Add color to bring your bouquet to life!

It’s time to make your flowers pop with cheerful colors! Fill in the petals with soft pinks, yellows, and oranges, color the leaves green, and give the bow a bright red hue. Now your adorable bouquet is ready to spread joy!
You Did It! Let’s Recap 🌸
Now that you’ve learned how to draw a flower bouquet, look at what you’ve created—a happy little bundle of smiling blooms tied with a bow! Isn’t it the cutest?
If you’re anything like me, you’ll want to draw this bouquet again and again, maybe changing the flower shapes or experimenting with colors. The great part is: once you master this design, you can create custom bouquets for birthday cards, planner pages, or just to unwind.
Want more flower fun?
If you enjoyed this tutorial, you’ll also love these easy step-by-step flower drawings:
- 🌺 How to Draw a Hibiscus Flower – Cute Hibiscus Drawing
- 🌻 How to Draw a Sunflower – Cute Sunflower Drawing Tutorial
- 🌹 How to Draw a Rose – Easy Rose Drawing
Each one brings a different vibe to your sketchbook, and together you’ll have your own mini flower shop—on paper!
Let’s Stay Creative Together 🎨
If you tried this flower bouquet drawing, I would LOVE to see it!
- Share your version on Pinterest and tag me here: Pinterest – Digital Drawing Ideas
- Or post it on Instagram and tag @digitaldrawingideas so I can cheer you on!
And hey—don’t worry if your drawing isn’t perfect. Mine weren’t either when I started. What matters is that you showed up and created something today. That’s magic. 💛
Before You Go…
Let me know in the comments (or on Pinterest):
What’s your favorite flower to draw? Or is there a flower you’d love me to turn into a step-by-step guide?
I’m always collecting new ideas—and your input helps shape what I create next!
Stay inspired,
Andi 🌼
lover of all things doodled, drawn, and joyfully colored

