How to draw a pig is one of those drawing topics that looks simple at first… until you actually put your pencil on the paper. I know this feeling very well, because I’ve been there too. I used to stare at a blank page, wondering how to make a pig look cute instead of awkward or stiff.
That’s exactly why I created this how to draw a pig tutorial. I wanted a pig drawing that feels friendly, soft, and beginner-friendly — something you can draw even if you’re tired, stressed, or just looking for a relaxing creative break. Every line you see here was drawn by me, step by step, with the goal of making the process feel easy and enjoyable.
If you’ve ever thought:
- “My pig drawings never look cute enough”
- “I don’t know where to start with the body”
- “I want a simple pig drawing I can actually finish”
You’re in the right place. This pig drawing tutorial focuses on simple shapes, gentle curves, and a cozy drawing rhythm you can follow at your own pace.
Take a deep breath, grab your pencil (or iPad), and let’s draw together.
Step 1: Draw the Head Shape
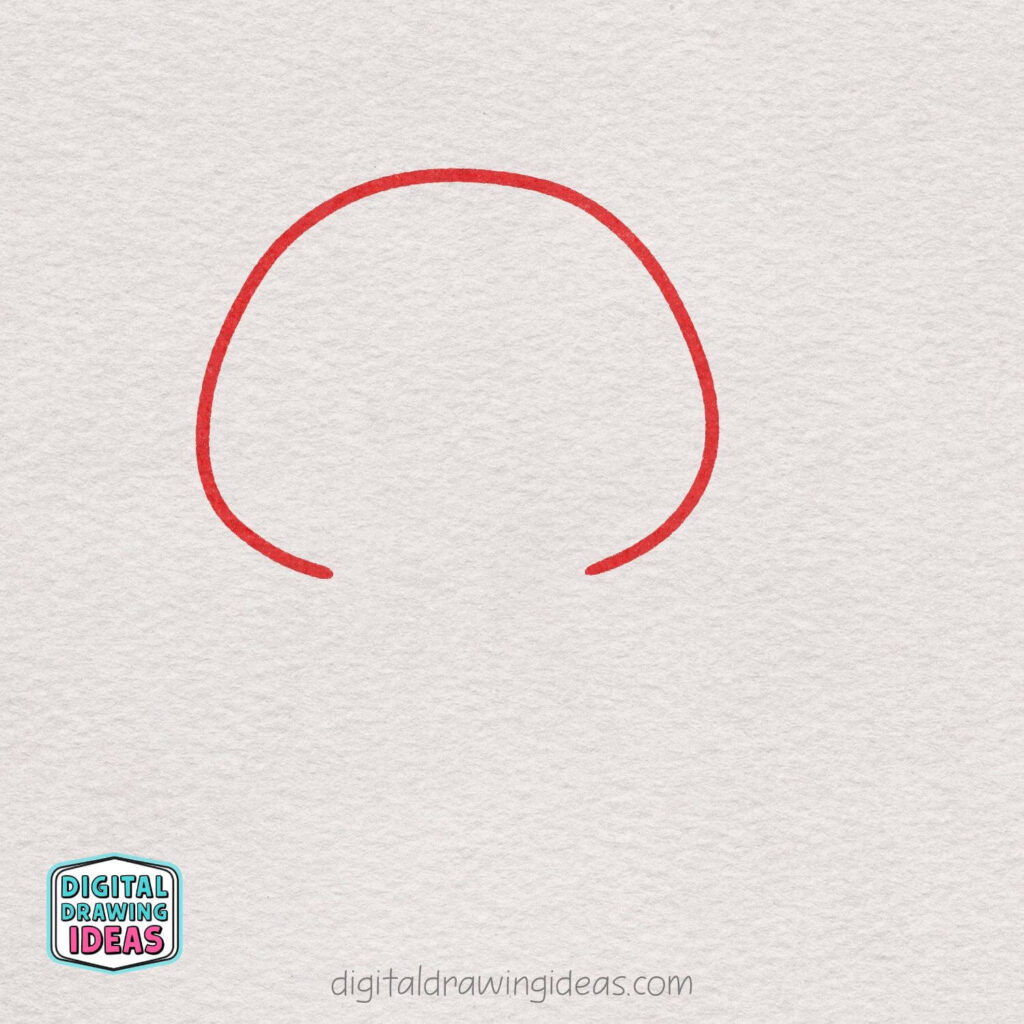
Start by drawing a large, rounded curve like an upside-down U.
This will be the main shape of the pig’s head, so keep it soft and slightly wide.
Leave the bottom open for now — we’ll connect it later.
Don’t worry about making it perfect; a slightly uneven line makes it extra cute! 🐷
Step 2: Add the Ears
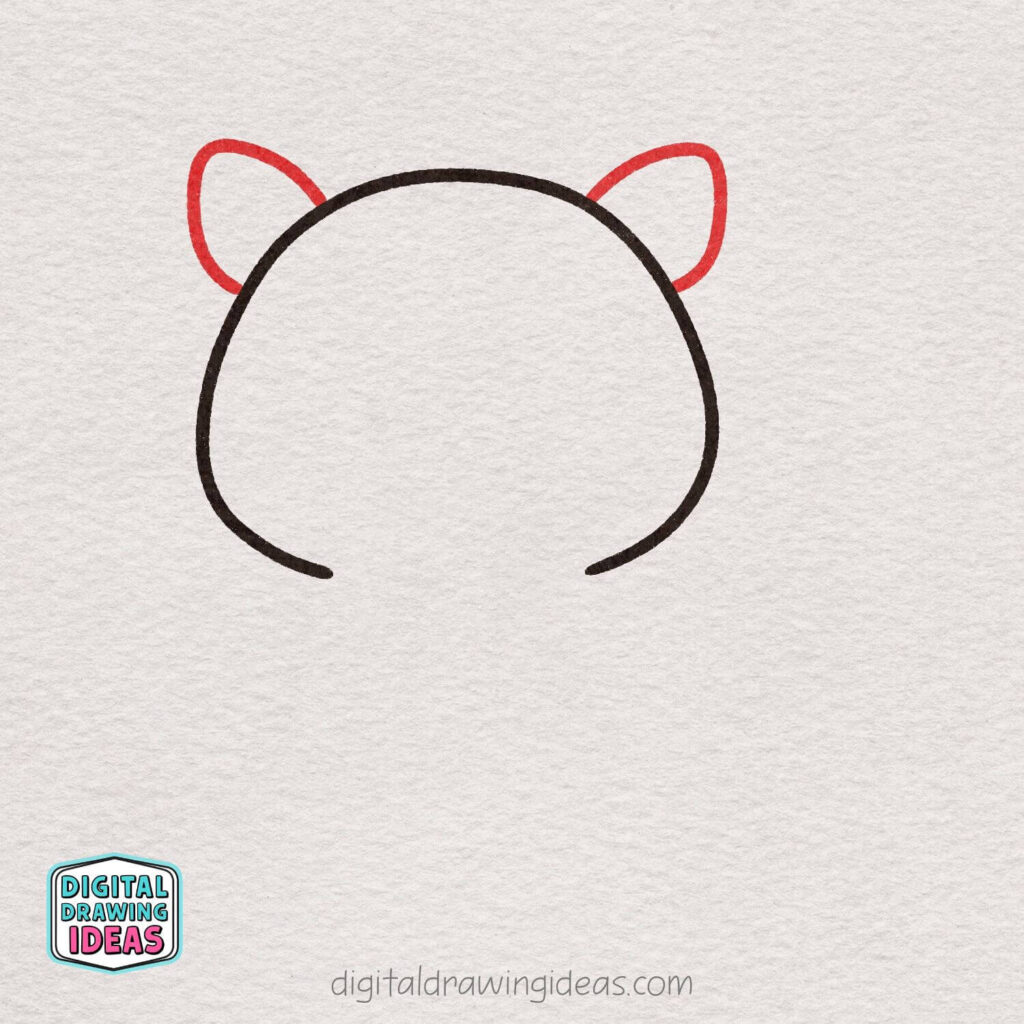
Draw two small, rounded ear shapes on top of the head.
Place one ear on each side, slightly tilted outward to keep them playful.
Keep the ears simple and soft — they should look like gentle curves, not sharp points.
Cute ears make your pig instantly come to life!
Step 3: Draw the Snout
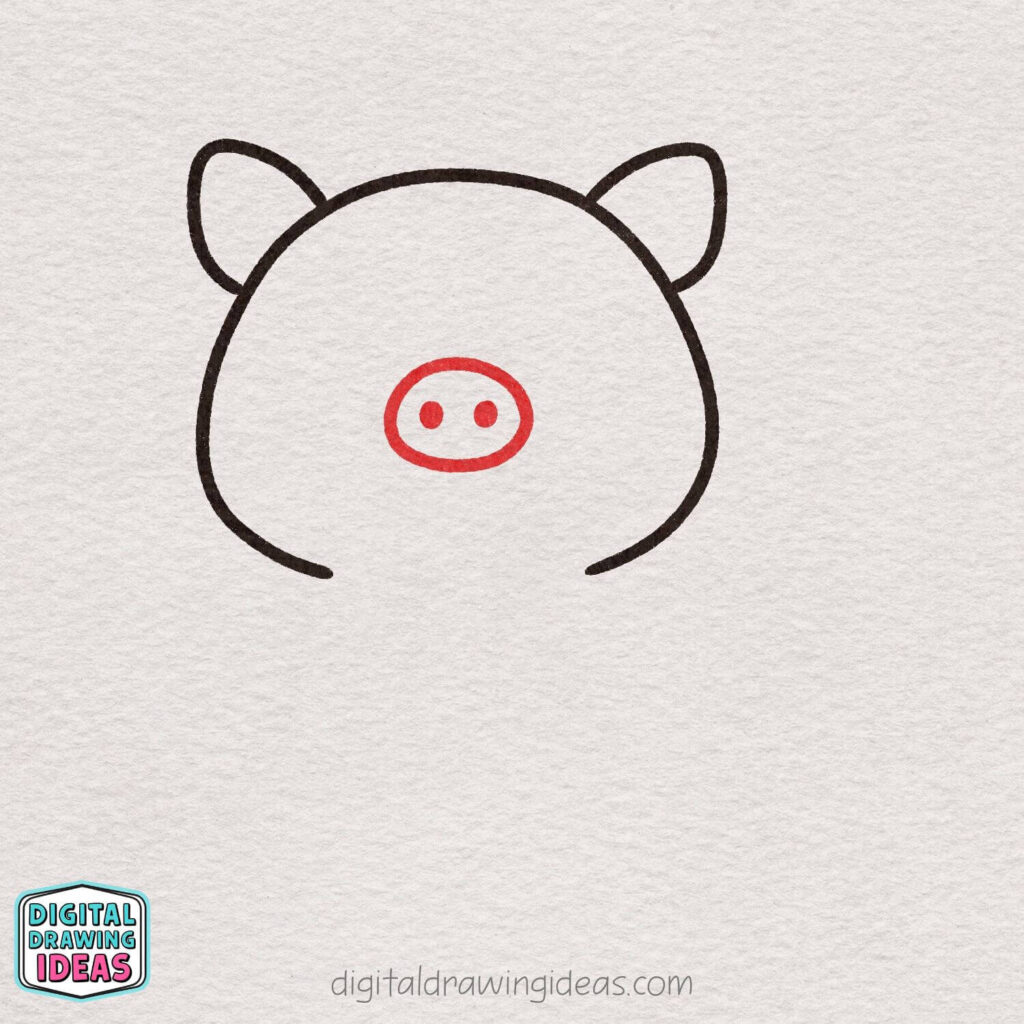
In the center of the face, draw a small oval for the pig’s snout. Inside the oval, add two tiny circles for the nostrils.
Keep everything simple and evenly spaced to maintain that cute look. This little snout gives your pig its adorable personality!
Step 4: Add the Face Details
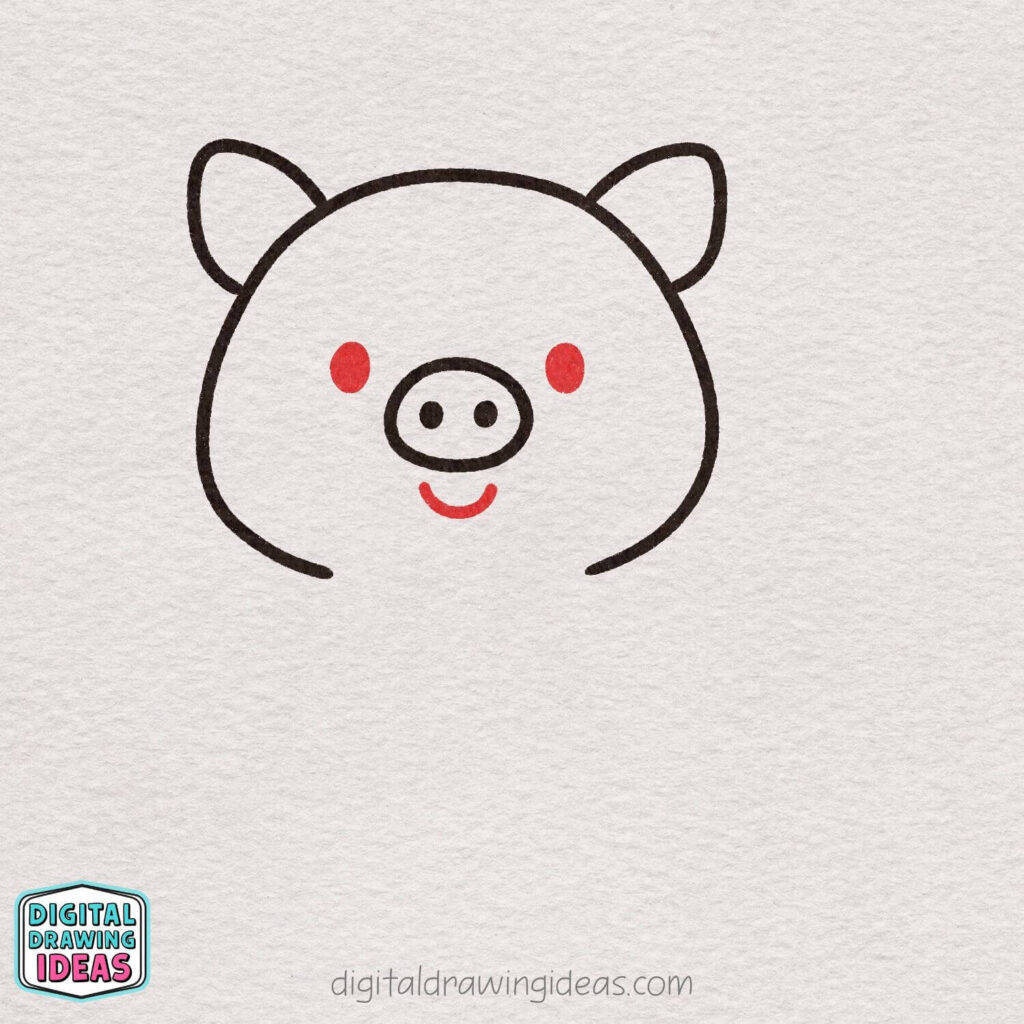
Draw two small dots on each side of the snout for the eyes.
Then add a short, curved line under the snout to create a happy smile. Keep the features tiny and simple to enhance the cute expression.
Your pig is already starting to look friendly and sweet!
Step 5: Start the Body and First Leg
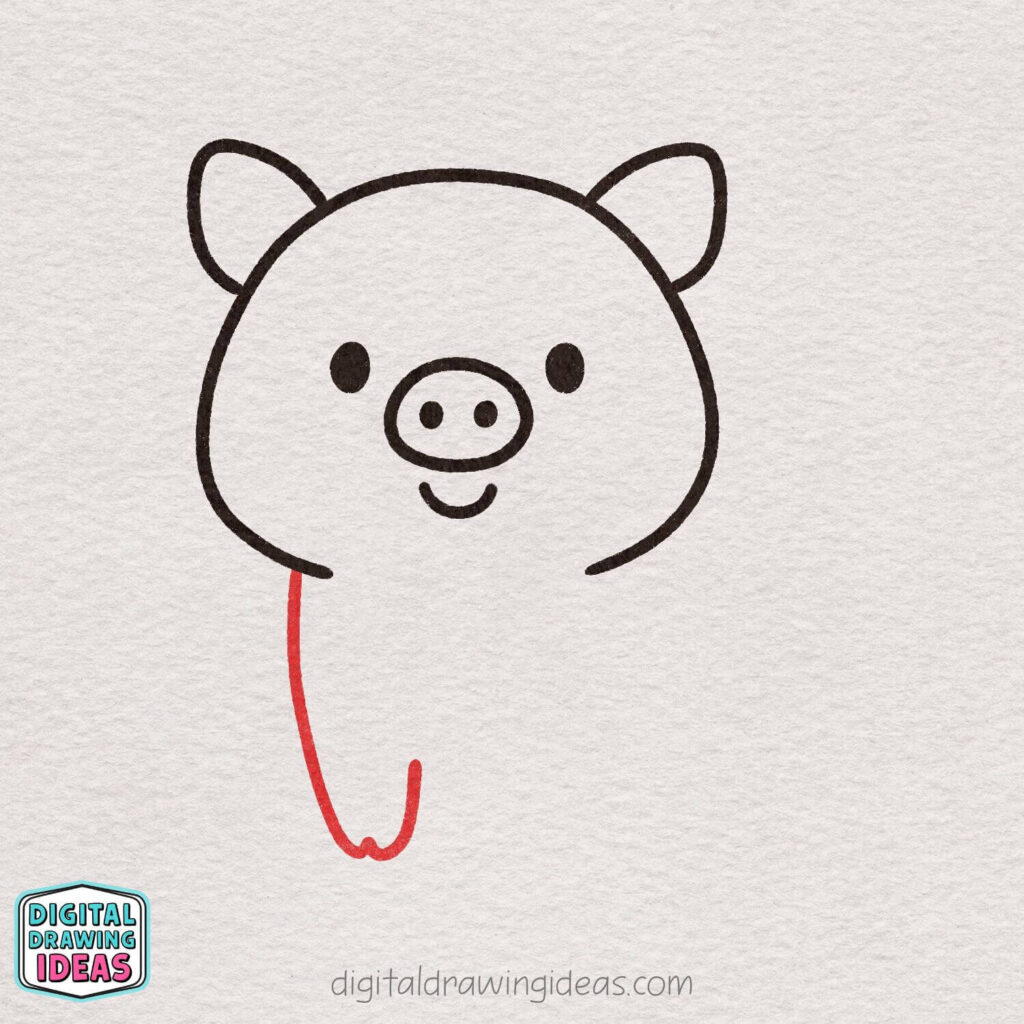
From the bottom left side of the head, draw a long curved line going downward to form the body. At the end of this line, add a small rounded bump to shape the first leg.
Keep the line smooth and relaxed — this helps the pig look chubby and cute.
You’re officially moving beyond the head now!
Step 6: Draw the Second Front Leg
Next to the first leg, draw another short, rounded leg shape. Keep it close and parallel so the pig looks sturdy and balanced.
Use soft curves and a small bump at the bottom for the hoof. Two legs down — your pig is standing strong!
Step 7: Add the Back and First Back Leg

From the right side of the head, draw a smooth curved line going down to form the pig’s back. Let the line bend gently outward to create a round, chubby body.
At the bottom, add a small rounded shape for the first back leg.
Nice and curvy — this is where the pig gets its cuddly shape!
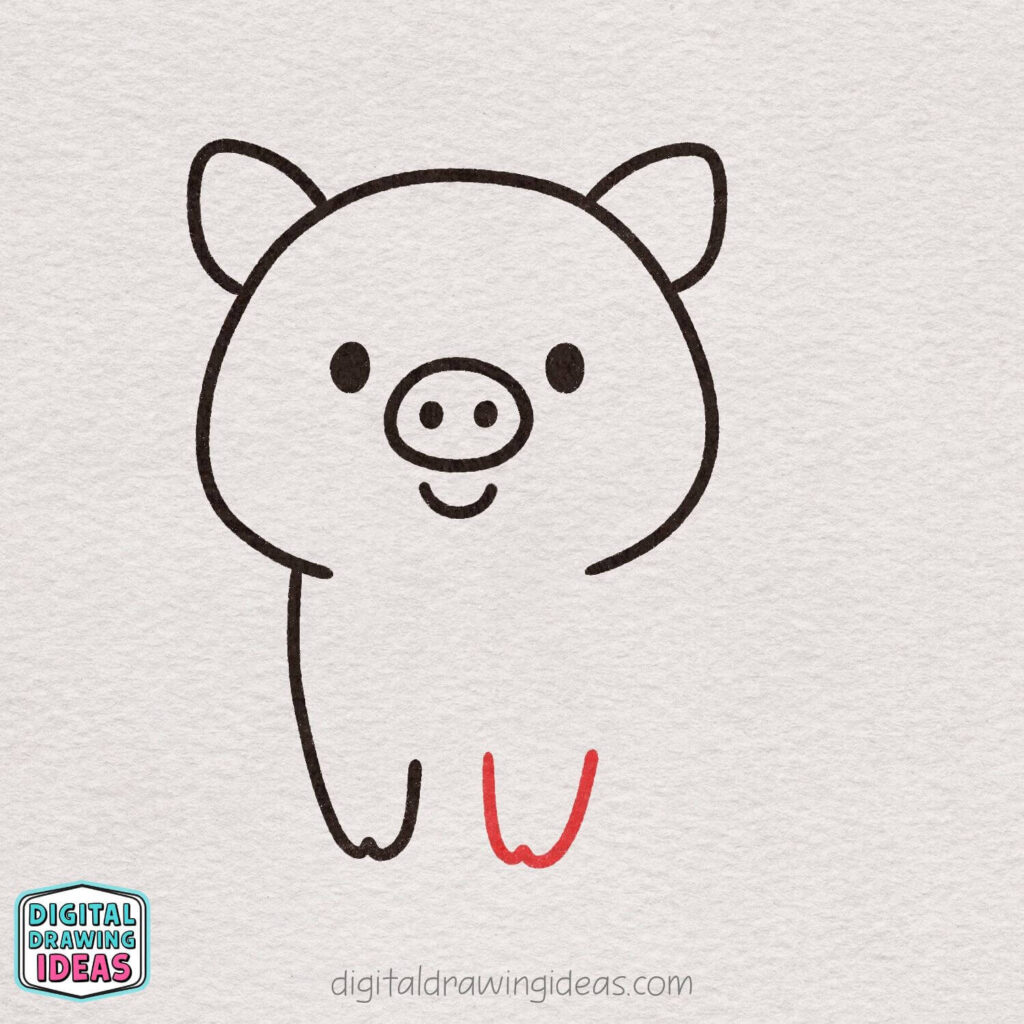
Step 8: Connect the Legs
Draw two short curved lines between the legs to connect them to the body.
These lines create the pig’s belly and help the legs feel attached and balanced. Keep the curves light and slightly rounded.
This step makes the body look complete and sturdy!
Step 9: Draw the Last Leg
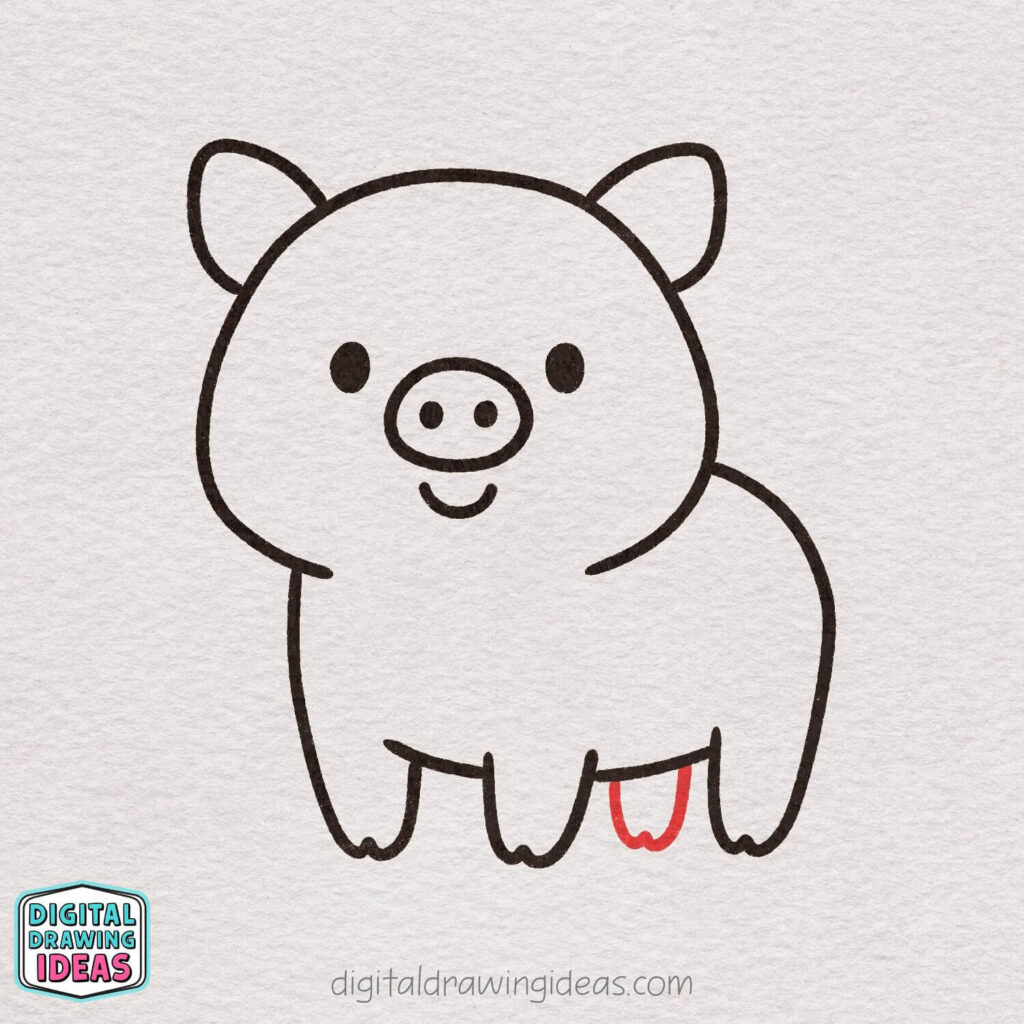
Add the final small leg between the two back legs. Keep it slightly shorter and tucked in to create depth.
Use a soft U-shape with a tiny bump at the bottom for the hoof.
Now your pig has all four legs and looks nice and balanced!
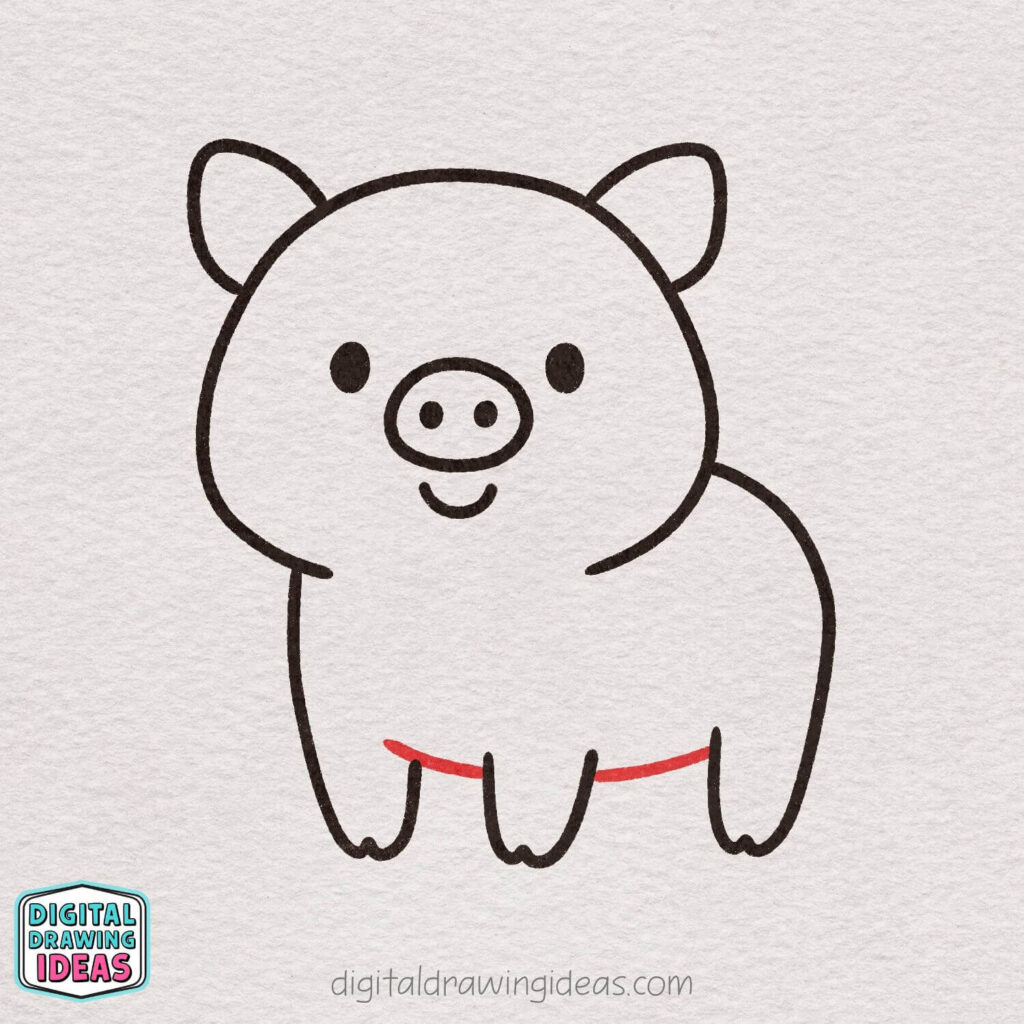
Step 10: Add the Hoof Details
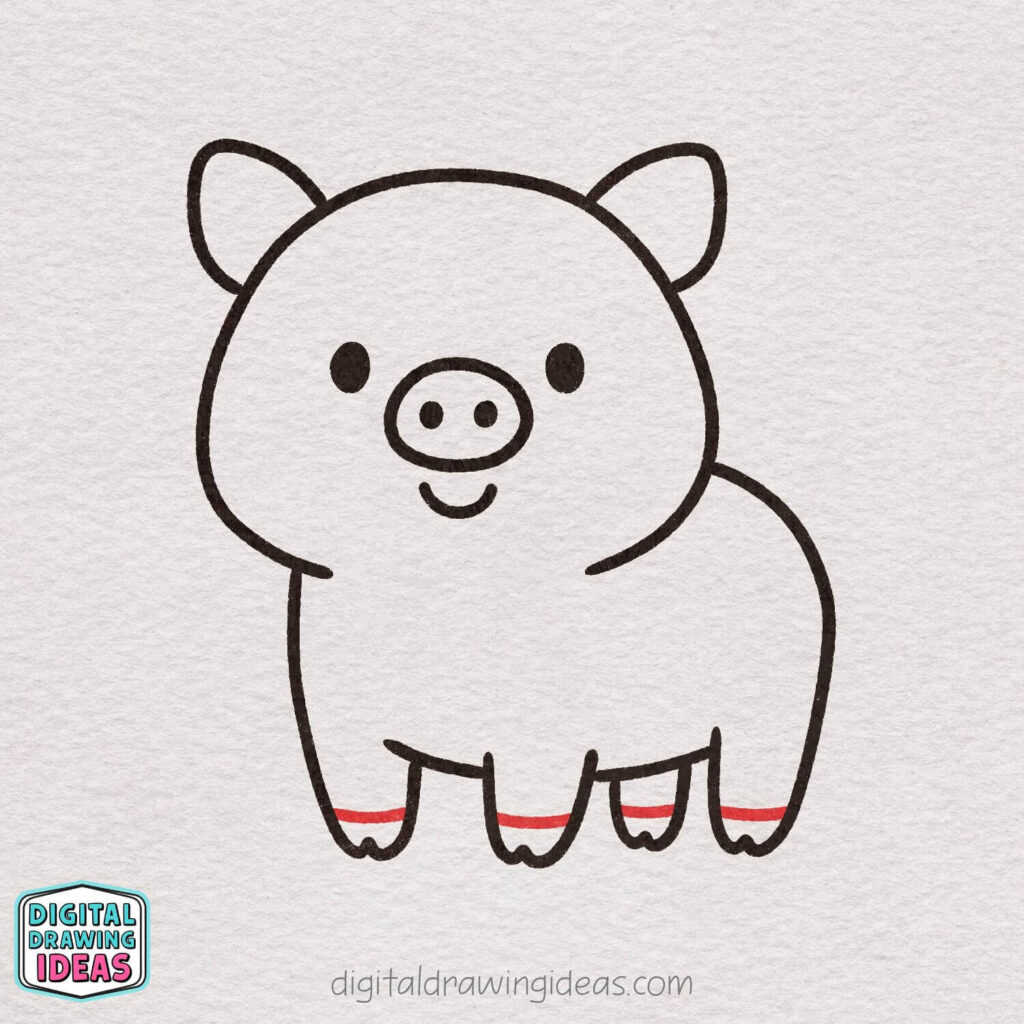
Draw short curved lines across the bottom of each leg to define the hooves.
Keep the lines small and gentle so they don’t overpower the legs. These tiny details add character while keeping the style simple.
Your pig is standing firmly now!
Step 11: Draw the Curly Tail
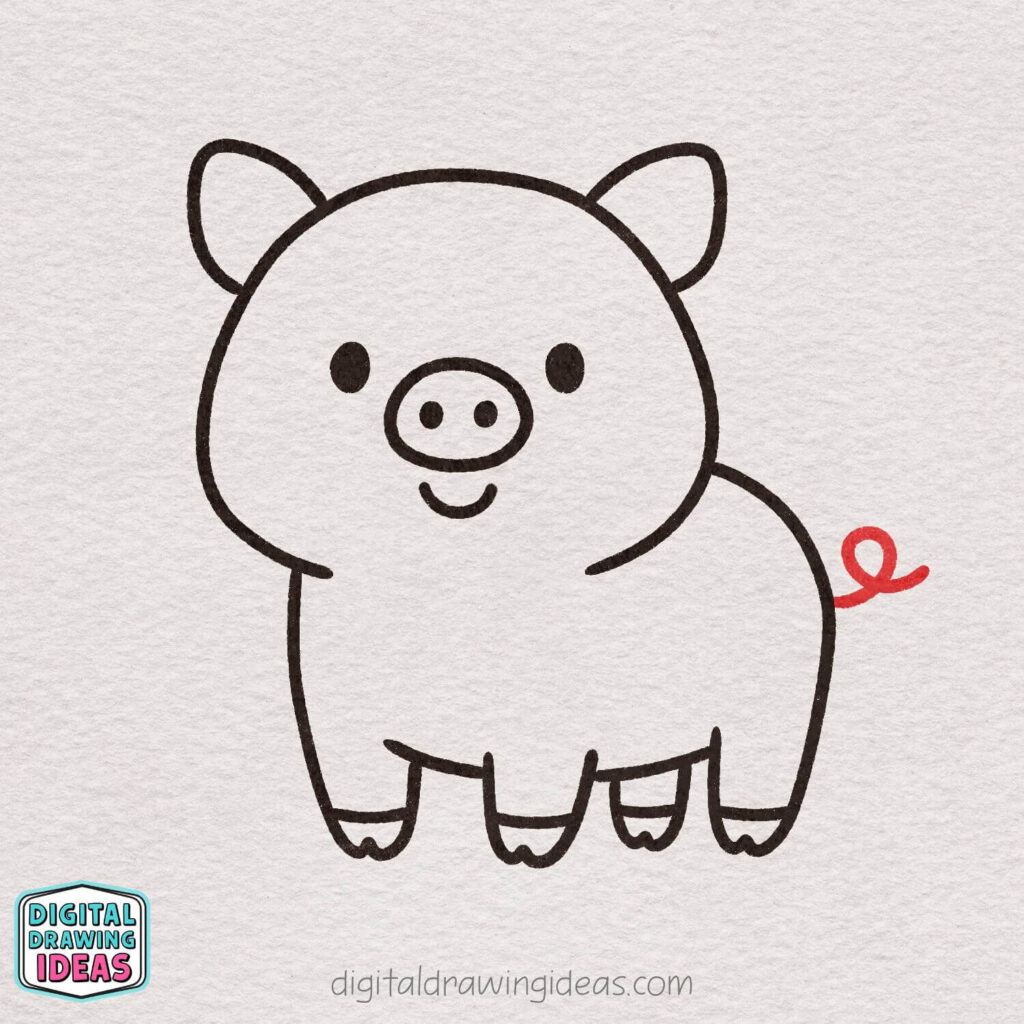
On the back of the body, draw a small curly line for the tail. Start with a tiny loop and let it curl outward in a playful way.
Keep it light and simple — a cute curl is all you need.
This little tail adds extra charm to your pig!
Step 12: Add Cute Background Details

Around your pig, draw a few simple decorative shapes like small sparkles and a heart. Place them loosely to keep the composition playful and balanced.
These tiny details make the drawing feel more fun and finished.
Feel free to add your own favorite shapes too!
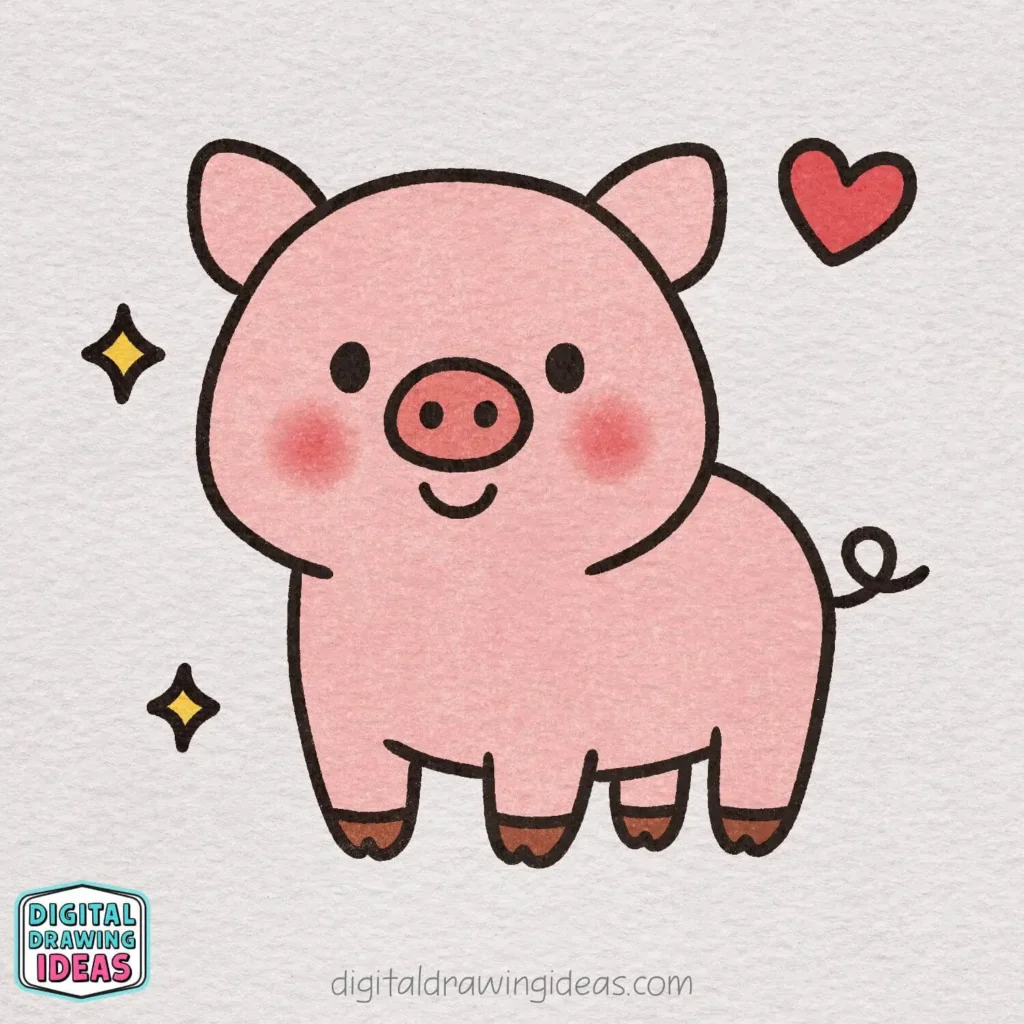
Step 13: Add Color and Finish Your Pig

Color the pig with a soft pink shade, keeping the tone light and even.
Add a slightly darker pink to the snout and gentle blush on the cheeks for extra cuteness.
Fill in the hooves with a darker color and color the background details if you like.
And that’s it — your adorable pig drawing is complete! 🐷🎉
Watch this Pig Drawing Tutorial on Youtube
Final Thoughts: Your Pig Drawing Is Just the Beginning
If you made it this far, I’m genuinely proud of you. How to draw a pig isn’t just about the final result — it’s about enjoying the process, letting go of perfection, and allowing yourself to create something playful and cozy.
I’ve noticed that once you finish one pig drawing, confidence builds fast. Suddenly, drawing animals doesn’t feel scary anymore — it feels fun. That’s why I always encourage you to keep going and try another cute animal next.
If you enjoyed this tutorial, you might also love:
- How to Draw a Capybara – Cute Capybara Drawing
- How to Draw a Goat – Cute Goat Drawing
- How to Draw an Owl – Cute Owl Drawing Tutorial
For daily inspiration and step-by-step drawings, you can also follow me on
DigitalDrawingIdeas on Pinterest
and subscribe to my
Digital Drawing Ideas YouTube channel.
Now I’d love to hear from you:
- Did you enjoy drawing this pig?
- Which animal should we draw next?
- Will you share your pig drawing on Pinterest or Instagram?
If you do, tag @digitaldrawingideas — I truly love seeing your creations and sharing them with the community.
Keep drawing, keep creating, and remember: you don’t need to be perfect to make something beautiful.

