Learning how to draw a grape is one of those simple little drawing projects that feels surprisingly satisfying once the bunch starts coming together.
I always love tutorials like this because they look much more detailed at the end than they actually are while you are drawing them. A grape bunch may seem a bit tricky at first, because there are so many little round grapes overlapping each other, but once you break it down into simple circles, it becomes much easier and a lot more fun.
I made this grape drawing myself with a very beginner-friendly approach in mind. No complicated sketching, no stressful proportions, and definitely no need to make every grape perfectly round. Honestly, slightly uneven circles often make the finished grape drawing look more charming and hand-drawn.
So if you have ever looked at a bunch of grapes and thought, “That looks cute, but where do I even start?” — I know that feeling too. The trick is to build the shape slowly, one grape at a time, almost like stacking little bubbles into a soft hanging cluster.
In this tutorial, I’ll show you how to draw a grape step by step, starting with one small circle and gradually turning it into a cute fruit doodle with a stem, leaf, curly vine, and color.

Why This Grape Drawing Is Great for Beginners
What I like most about this tutorial is that it is simple, but it still feels complete when finished. You are not just drawing a random circle and calling it a grape. You are building a full little fruit bunch with personality.
This grape drawing is especially helpful if you want to practice:
- Drawing rounded shapes
- Overlapping simple forms
- Creating a balanced fruit cluster
- Adding small nature details like leaves and vines
- Coloring a cute doodle without making it too complicated
I also think this is a lovely drawing idea for sketchbooks, bullet journals, handmade cards, classroom-style art practice, or just a cozy creative break when you want to draw something cheerful.
And don’t worry if your grapes lean a little to one side or your leaf comes out extra wiggly. Mine do that sometimes too, and I’ve learned to call it “character” instead of a mistake.
A Few Quick Tips Before You Start
Before we jump into the steps, here are a few small things that can make this tutorial easier.
Try to keep your first few circles close together. If the grapes are too far apart, the bunch may look more like floating bubbles than fruit.
Let some of the grapes overlap slightly. This is what gives the bunch that full, layered look.
You can also sketch lightly with pencil first if you want, then go over your lines with a black pen or marker. I usually like this method because it gives me a little freedom to adjust the placement before committing to the final outline.
For coloring, purple is the classic choice, but you can absolutely make green grapes, red grapes, or even a pastel fantasy grape bunch if that fits your style better.
Supplies You Can Use
You do not need anything fancy for this how to draw a grape tutorial. Use whatever you already have nearby.
A few simple supplies that work well:
- Pencil
- Eraser
- Black pen or marker
- Purple, green, and brown markers or colored pencils
- Paper or sketchbook
I used a clean outlined style for my own drawing because I love how bold and easy-to-follow it looks in step-by-step tutorials. The red lines in the images show the new part added in each step, so you can follow along without guessing what changed.
How to Draw a Grape Step by Step
Now let’s start the main tutorial. Follow each step slowly, and remember that the grape bunch does not need to be perfect to look cute.
Step 1: Draw the First Grape
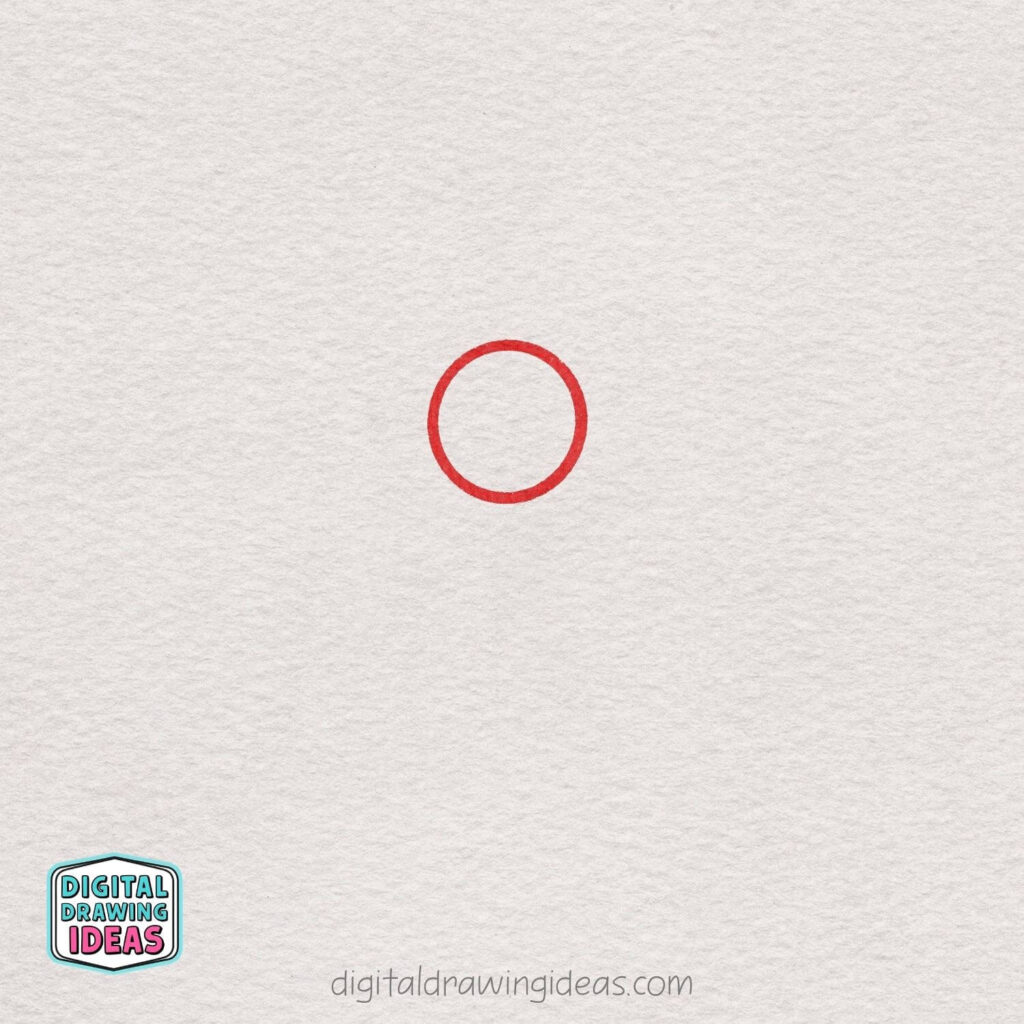
Start by drawing a small circle near the upper middle area of your page. This will be the very first grape in the bunch, so try to keep the shape nice and round.
Don’t worry if it isn’t perfectly symmetrical—slight imperfections can make your drawing feel more natural and hand-drawn.
Step 2: Add a Second Grape
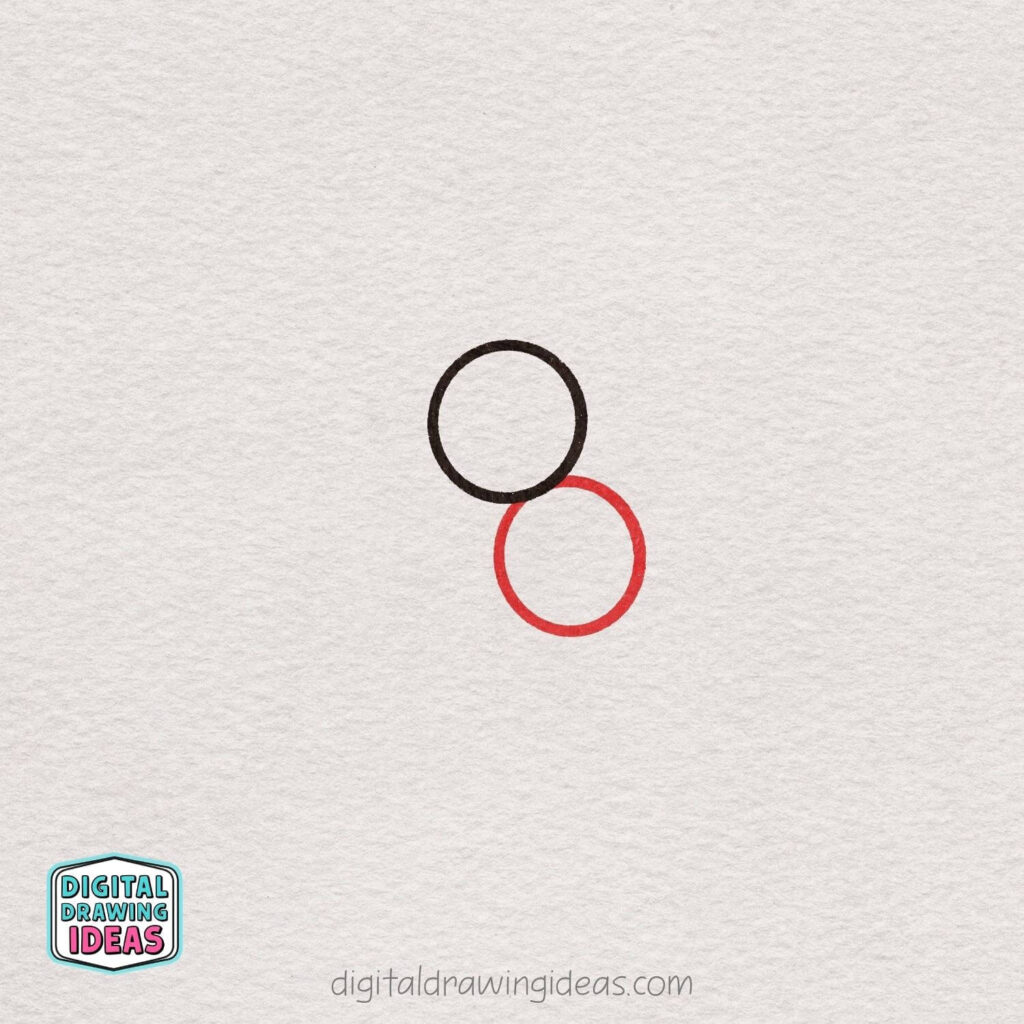
Now draw another circle just below and slightly to the right of the first one. Let it overlap a little so the grapes begin to look connected as part of the same bunch.
Try to keep this circle about the same size as the first grape to make the cluster look balanced and neat.
Step 3: Build the Top of the Bunch
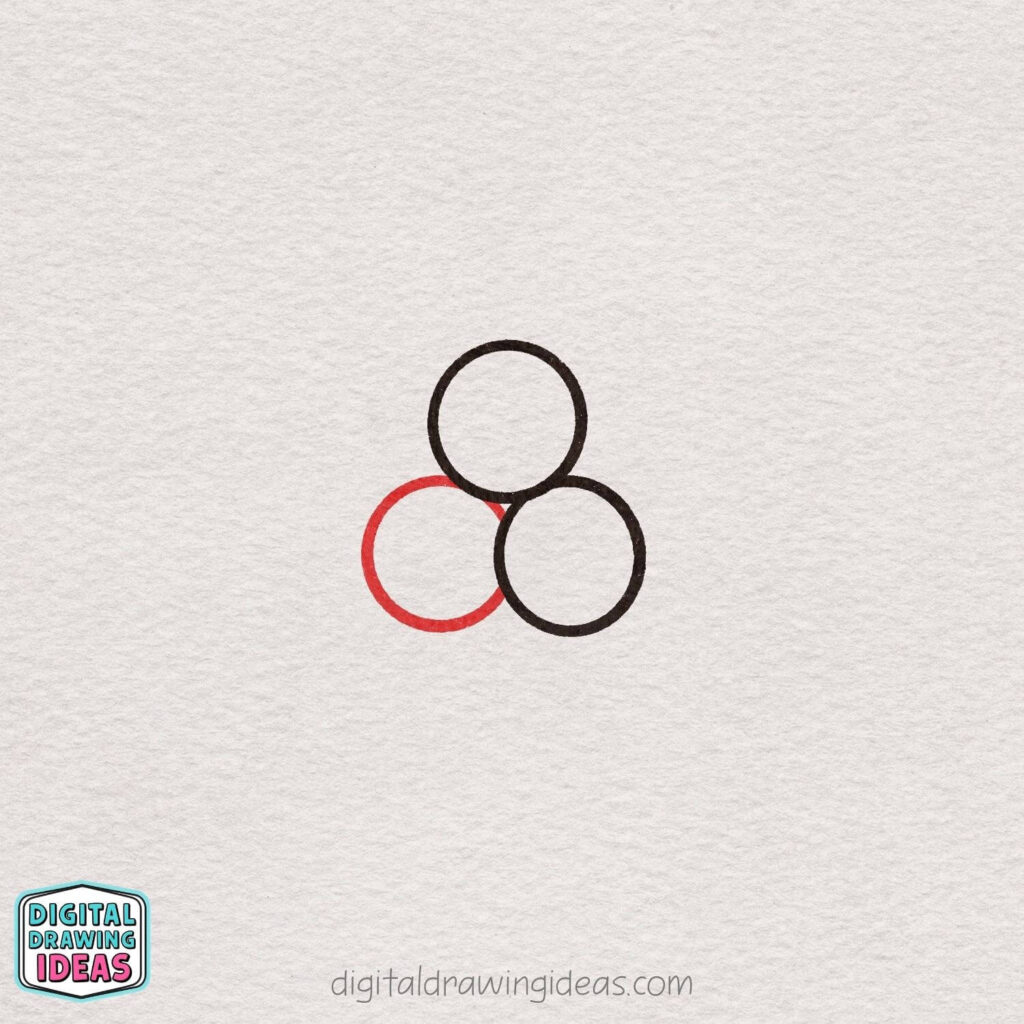
Next, draw a third circle on the lower left side of the group. Position it so it slightly overlaps the top grape and the grape on the lower right, helping the cluster start to fill out nicely. Keep this grape about the same size as the others so the bunch looks even and cohesive.
Step 4: Add Two More Grapes at the Top
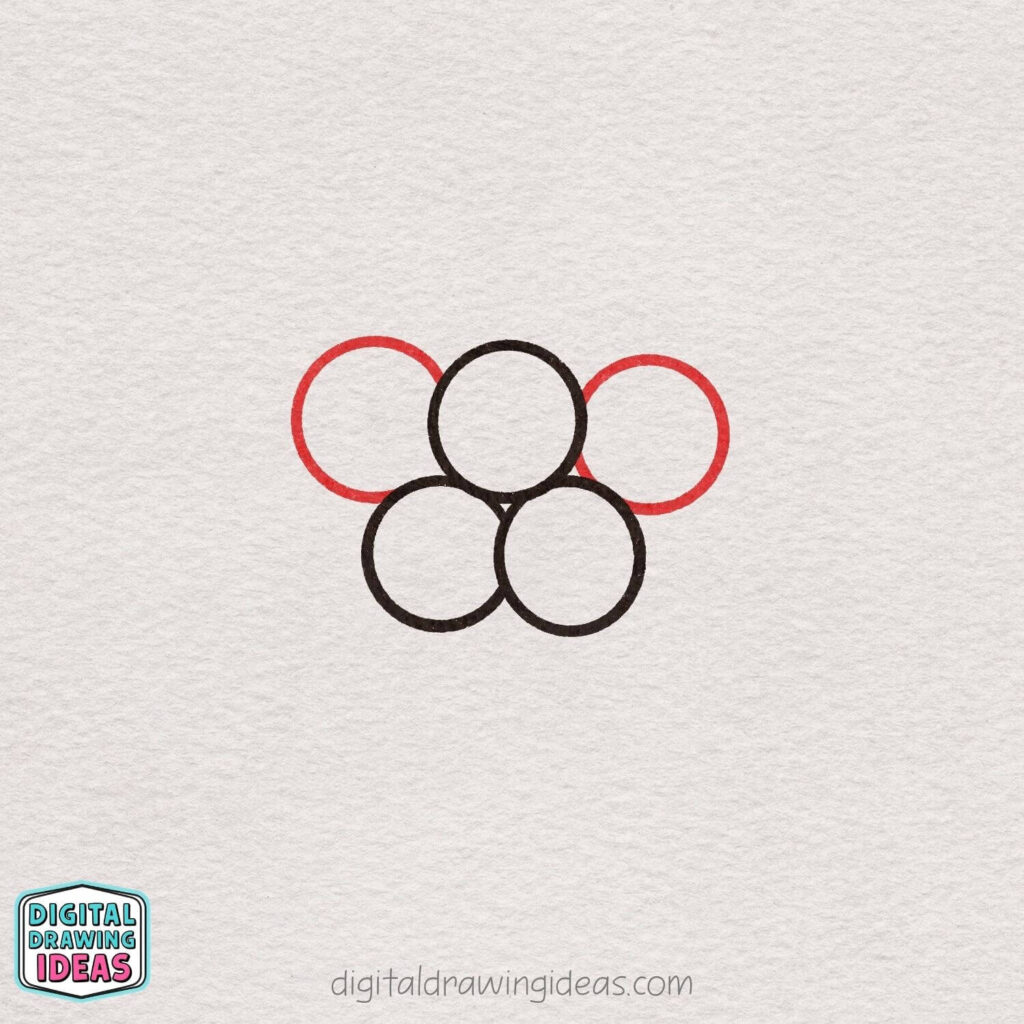
Now draw one circle on the upper left side and another on the upper right side of the bunch.
Place both grapes so they tuck in neatly behind the top middle grape, helping the cluster spread outward and look fuller.
Try to keep the spacing even and the circles similar in size so the top of your grape bunch feels nicely balanced.
Step 5: Draw the Bottom Grape
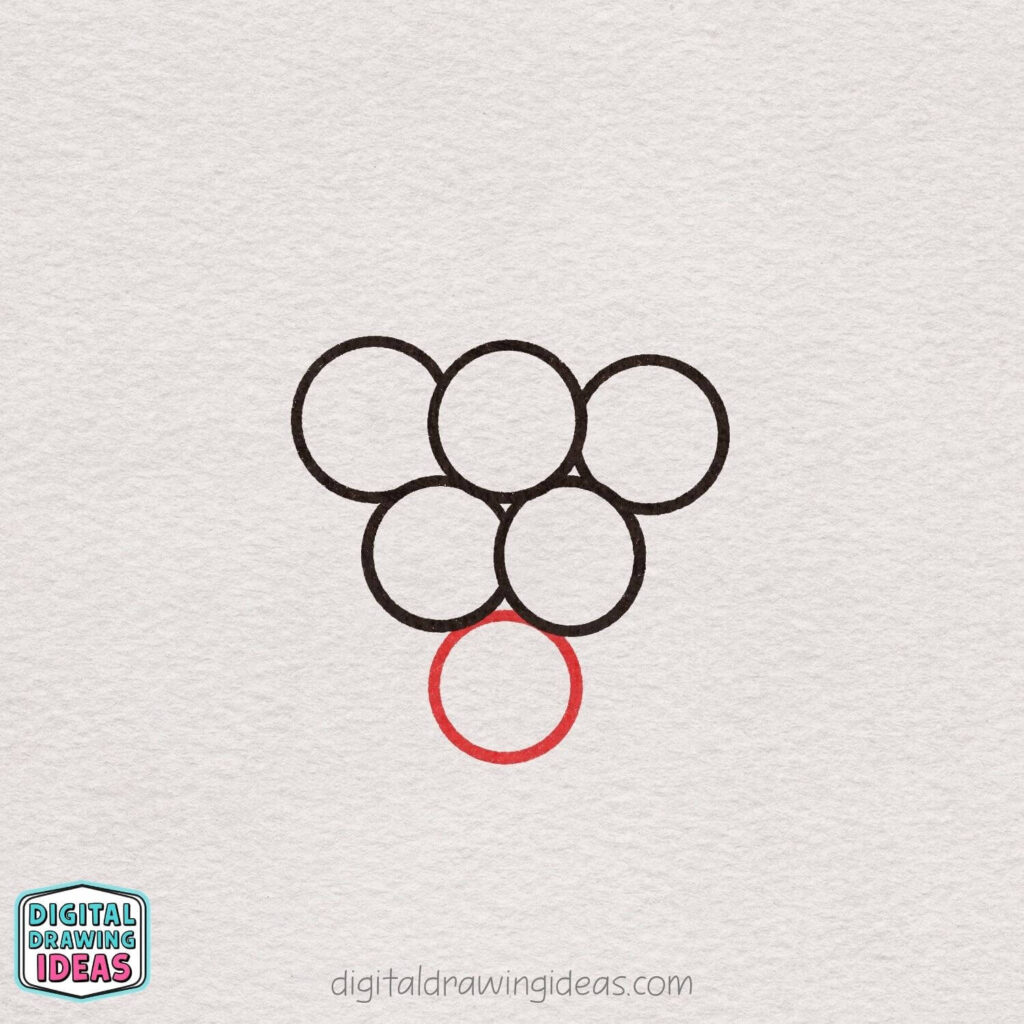
Next, add one more circle directly below the two middle grapes. Center it so it sits neatly underneath them, creating the pointed lower part of the grape bunch.
This grape helps give the cluster its classic shape, so try to place it evenly and keep it the same size as the others.
Step 6: Extend the Bunch Downward
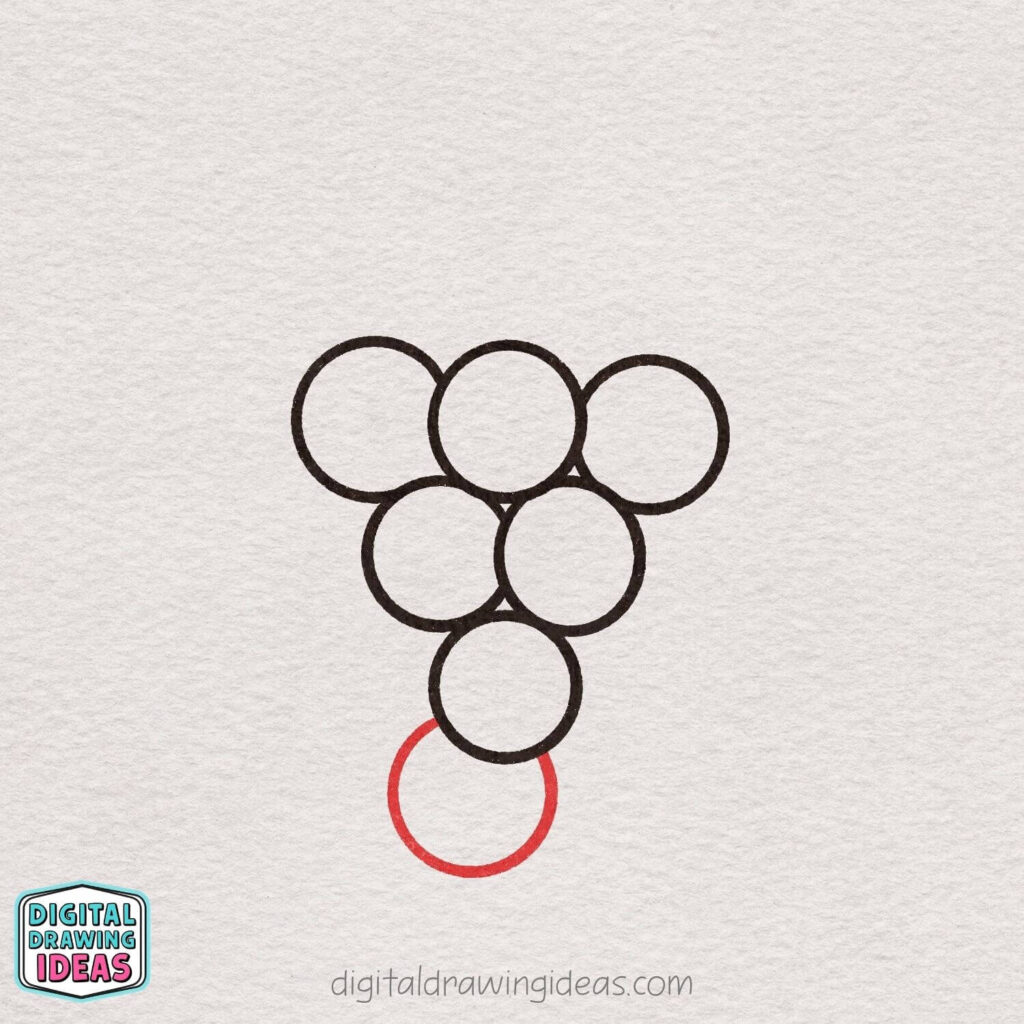
Draw another circle below the previous bottom grape, placing it slightly to the left. Let it overlap a little with the grape above so the bunch continues to feel connected.
This new grape makes the cluster longer and gives the drawing a more natural hanging shape.
Step 7: Make the Bunch Wider
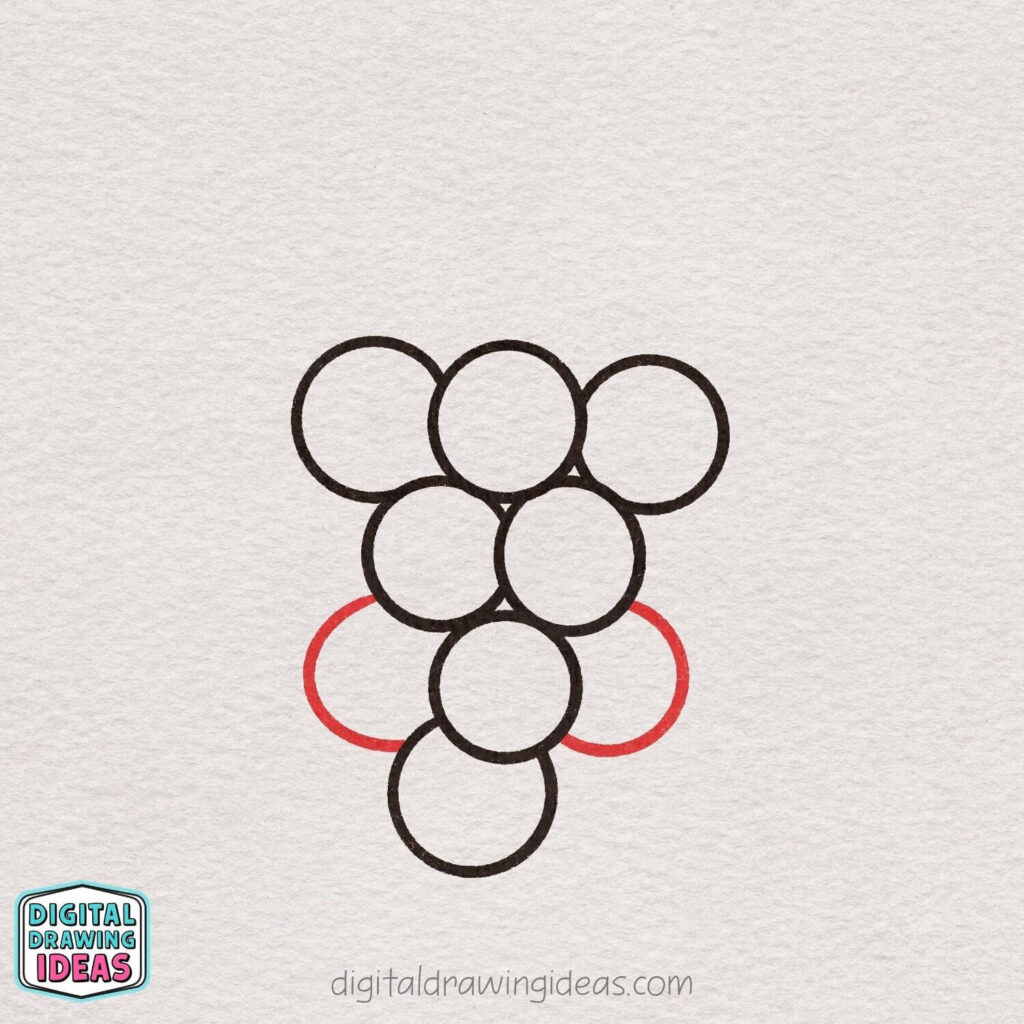
Now add two more circles, one on the lower left side and one on the lower right side of the bunch. Place them behind the middle grapes so only the outer parts show, creating a fuller and more rounded cluster.
These side grapes help the bunch look more natural instead of too straight or narrow.
Step 8: Add the Outer Side Grapes
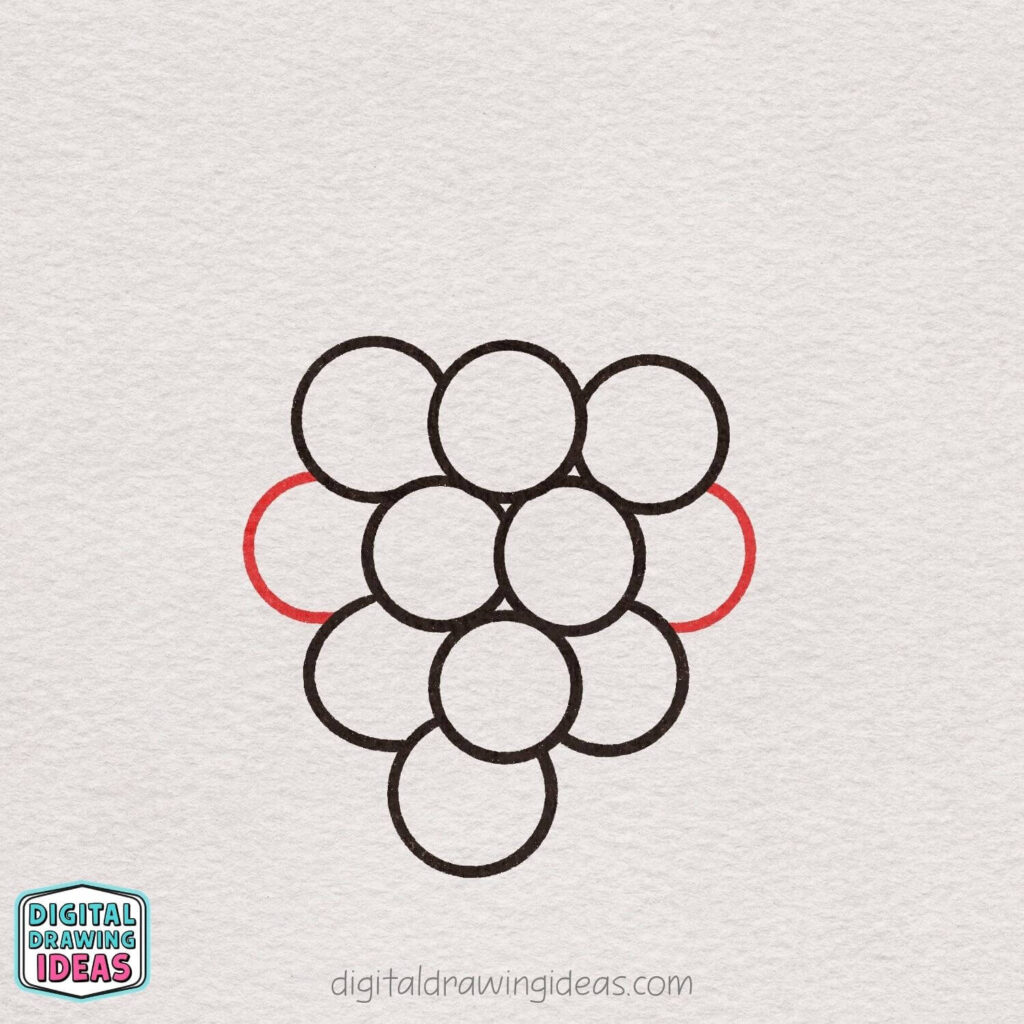
Next, draw two more circles on the outer left and outer right sides of the bunch. Place them slightly behind the grapes you already drew, so only part of each new circle is visible.
These grapes make the cluster look fuller and give the bunch a soft, rounded shape from side to side.
Step 9: Draw the Stem
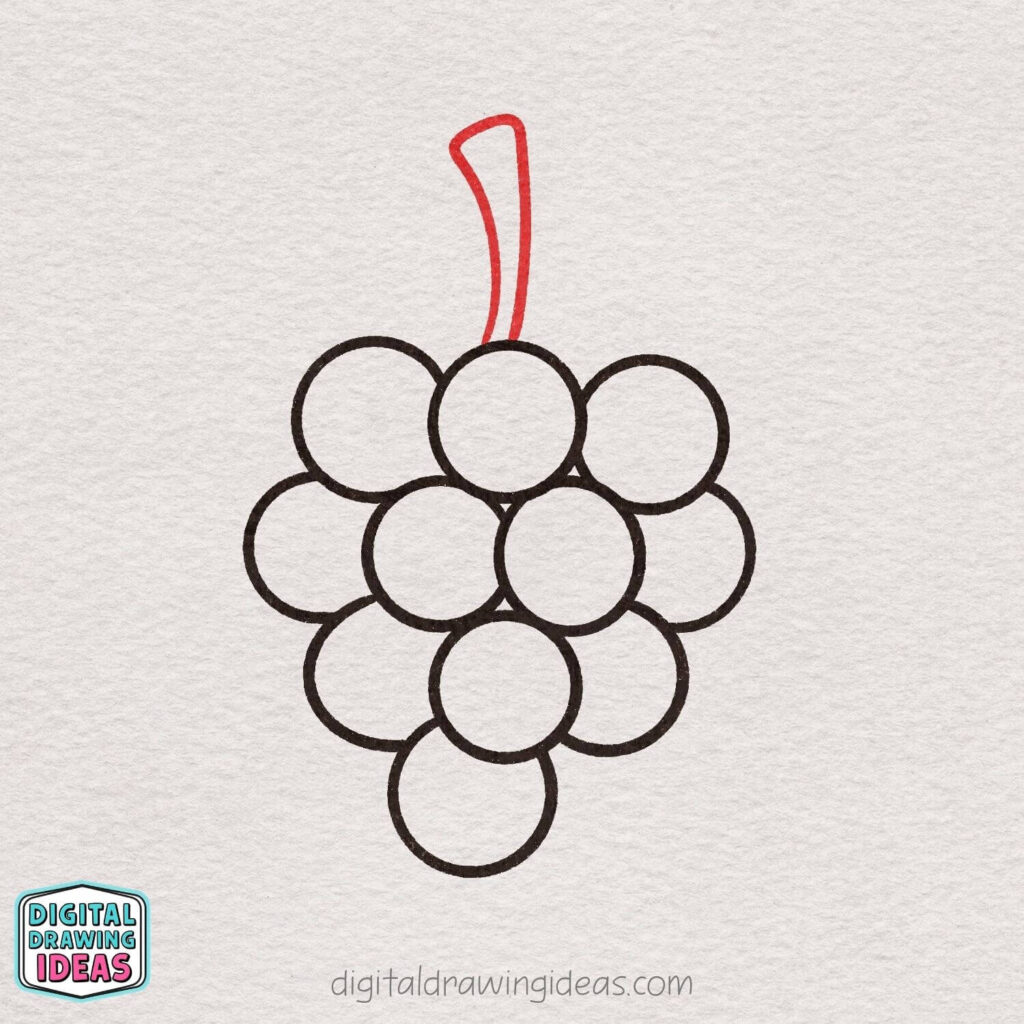
Now add the stem at the top of the grape bunch. Start from the top middle grape and draw two slightly curved lines going upward, then connect them at the top to create a soft, rounded shape that is a little wider at the top than at the bottom.
This stem gives your grapes a more finished look, so feel free to keep the lines gently uneven for a more natural, hand-drawn feel.
Step 10: Add the Main Stem for the Leaf
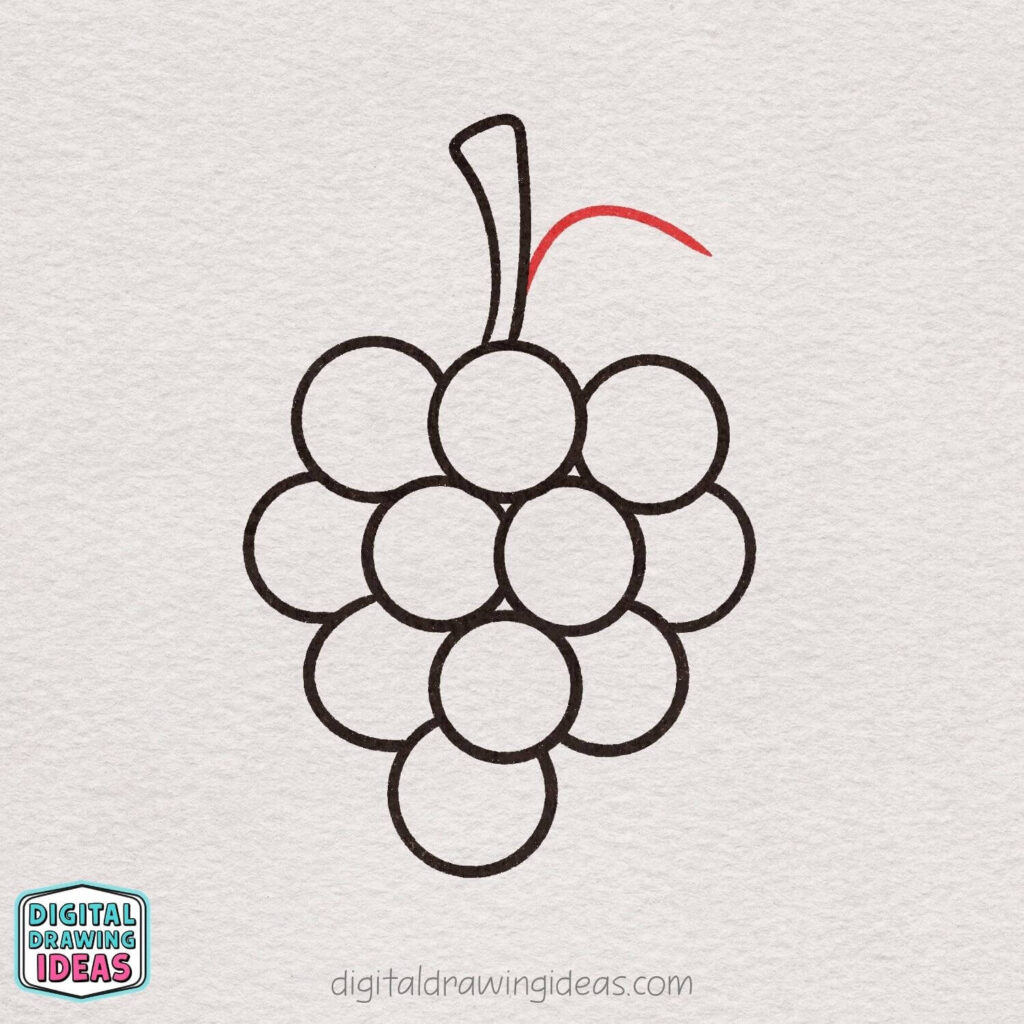
Next, draw a curved line starting near the top of the grape bunch, right beside the stem. Let it sweep upward and out to the right in a gentle arc.
This will become the main stem of the leaf, so keep the line light and smooth, giving yourself enough space to build the leaf shape around it in the next steps.
Step 11: Outline the Grape Leaf
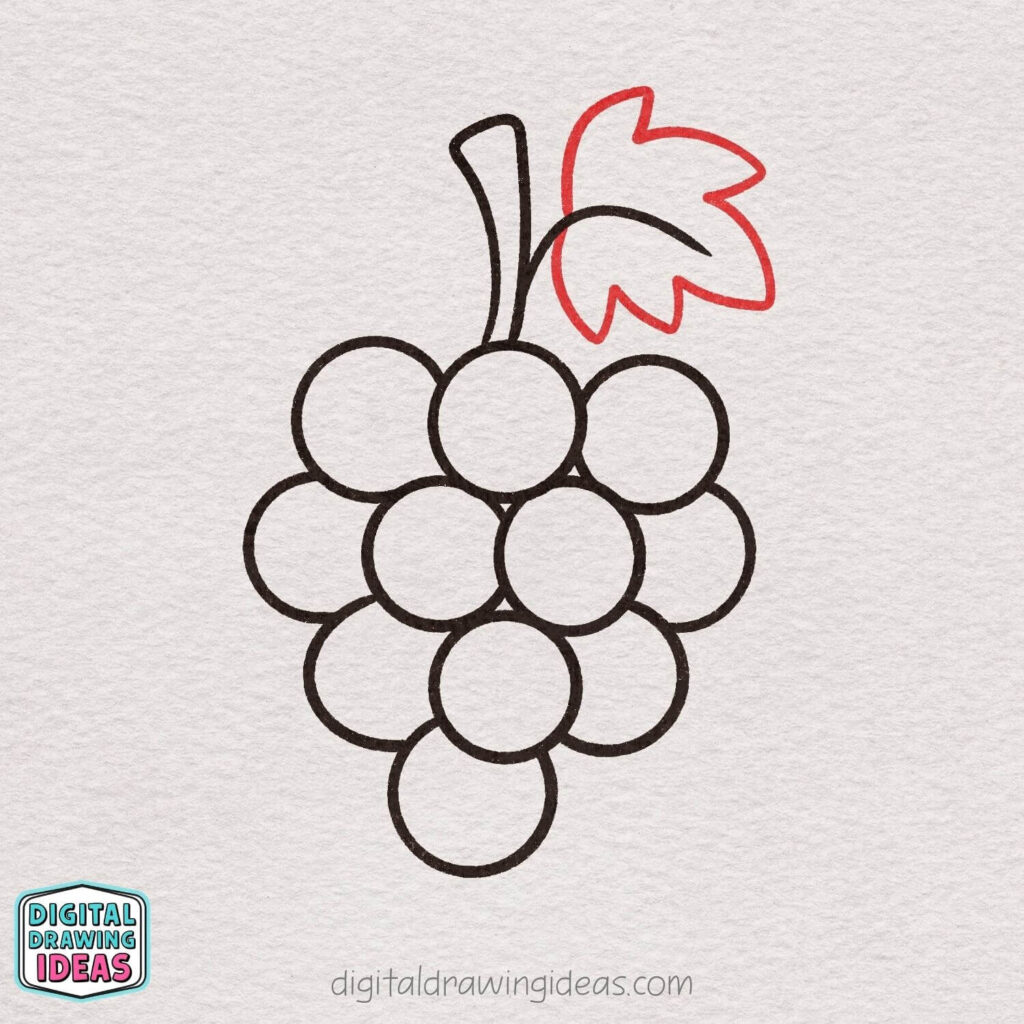
Now draw the full leaf shape around the curved leaf stem. Create a pointed, wavy outline with several small dips and tips, almost like a simple maple-style leaf.
Let the bottom of the leaf connect near the top of the grape bunch, and keep the shape slightly playful and uneven so it looks natural and hand-drawn.
Step 12: Add the Leaf Veins
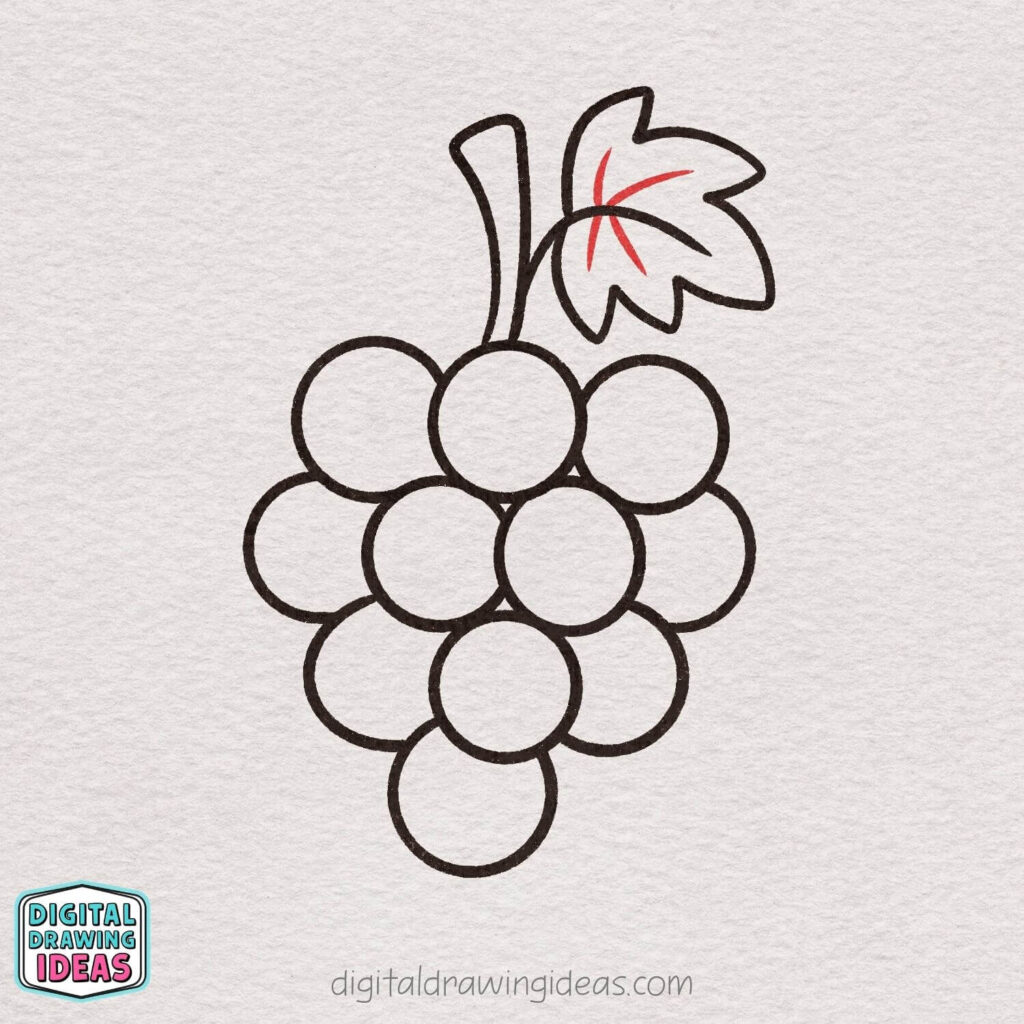
Now draw a few curved lines inside the leaf to create the veins. Start them near the base of the leaf where it connects to the small leaf stem, then let them spread outward toward the different points of the leaf.
These simple vein lines add a nice bit of detail and help the leaf look more finished without making it too complicated.
Step 13: Add the Curly Vine

Now draw a small curly vine coming out from the top left side of the grape bunch. Start near the base of the stem, curve the line outward, and then loop it into a loose spiral.
This little detail makes the grape bunch feel more playful and natural, like it is still growing on the vine.
Step 14: Color Your Grape Drawing

Now it’s time to bring your grape bunch to life with color. Fill the grapes with a bright purple shade, then color the stem brown and the leaf green.
You can keep the colors smooth and simple, or add a little extra layering if you want a richer look.
Once everything is colored in, your cute grape drawing is finished!
More Easy Fruit Drawing Ideas
If you enjoyed learning how to draw a grape, you might also like trying a few more fruit tutorials next. Fruit drawings are such a fun way to practice simple shapes, and they look adorable together as a little collection.
You can continue with my easy strawberry drawing tutorial if you want something sweet and cheerful with a cute berry shape.
You might also enjoy this easy pear drawing tutorial if you want to practice a softer fruit shape that is a little different from circles.
And if you want another classic fruit doodle, try my easy apple drawing tutorial too. Apples, pears, strawberries, and grapes would look so cute together on one sketchbook page.
Final Thoughts on This Easy Grape Drawing
I hope this tutorial made how to draw a grape feel simple, relaxing, and actually fun. Sometimes the best drawings are the ones that start with the easiest shapes, and this grape bunch is a perfect example of that.
You begin with one small circle, then slowly build a whole cluster by adding more grapes around it. After the stem, leaf, curly vine, and color are added, the drawing suddenly feels complete — almost like a tiny fruit illustration you could use in a journal spread or on a handmade card.
What I love about this grape drawing is that it gives you room to make it your own. You can make the grapes rounder, taller, more playful, darker purple, lighter purple, or even turn them into green grapes. There is no one perfect version, and that is exactly what makes drawing feel so freeing.
If you try this tutorial, I’d love to see your version. You can follow me on Pinterest for more easy drawing ideas, and you can also check out my videos on YouTube.
You can also share your finished drawing on Pinterest, or tag me on Instagram at @digitaldrawingideas so I can see your creative grape bunch. Did you keep your grapes purple, or did you try another color? And which fruit should we draw next?

